

What is an APK file and how do you install one
Содержание
-
1 What is an APK file and how do you install one
- 1.1 What is an APK file and how do you install one?
- 1.2 Finding the Package Name of Android Apps
- 1.3 Package Structure in Android Studio
- 1.4 How to determine the package name of an Android App
- 1.5 Build and run the application
- 1.6 Finding the Package Name of Android Apps
- 1.7 How to determine the package name of an Android App
- 1.8 What is the Android Application Package?
- 1.9 Package Structure in Android Studio
What is an APK file and how do you install one?
5 min read 5 min
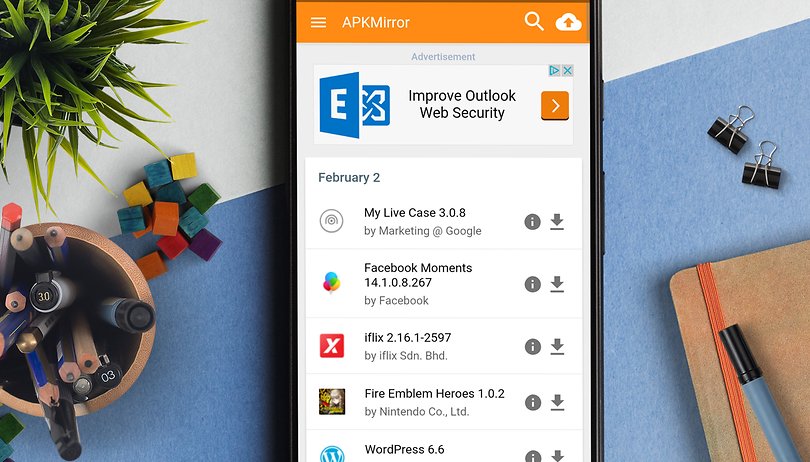
If you own an Android device you will likely have heard of an APK file at some point, and possibly wondered what it even is. Understanding this is essential if you want to start downloading leaked apps or customizing your Android experience further than would be possible using the Play Store alone. In our guide, you’ll learn what APK files are, how to download them, and finally, how to install them.
Jump to:
- What is an APK File?
- Why would I want to install an APK File?
- How to install an APK from your Android device
- How to install APK Files from your computer
Finding the Package Name of Android Apps
There are several ways to find out the package name of an Android app. I am listing down the various methods. You can follow any of them as per your convenience.
Method 1 – From the Play Store
As I mentioned, the Play Store also uses the Android app package name to list unique apps. So, the easiest way to find the app package name is via the Play Store.
On a PC/Mac:
- Open play.google.com in your web browser.
- Use the search bar to look for the app for which you need the package name.
- Open the app page and look at the URL. The package name forms the end part of the URL i.e. after the id=?. Copy it and use it as needed.
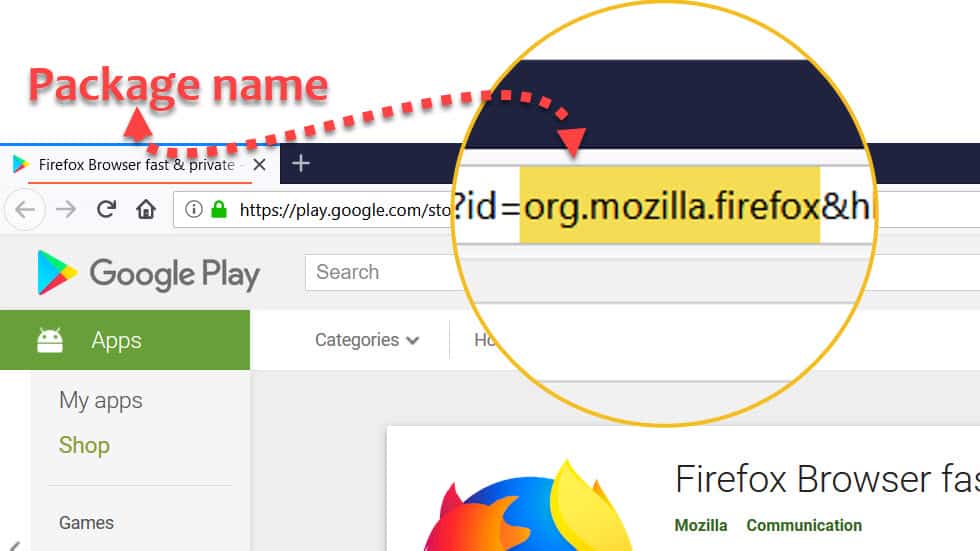
 Note: Ignore any other information in the URL. It is not a part of the package name.
Do note that it is only applicable to apps which are listed on Play Store. For 3rd party apps, follow one of the alternative methods as listed below.
On Android mobile device
Most Android mobile browsers will redirect you to the Play Store app when you access the website. So, how do you find the package name from Play Store Android app? Here are the steps you can follow:
- Scroll down to the end of the page till you see the (share) button.
- Use it and share the Play Store app link to any service from where you can select and copy text. I usually use messaging without sending it to any recipient.
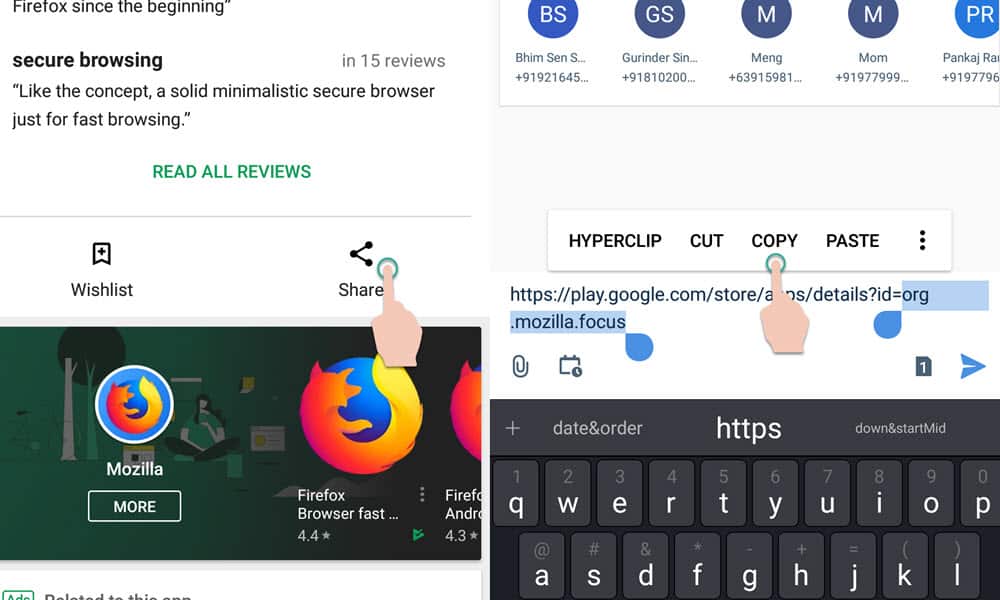
- The app package name will at the end of the app link which you just shared. Copy it off and use it as needed.
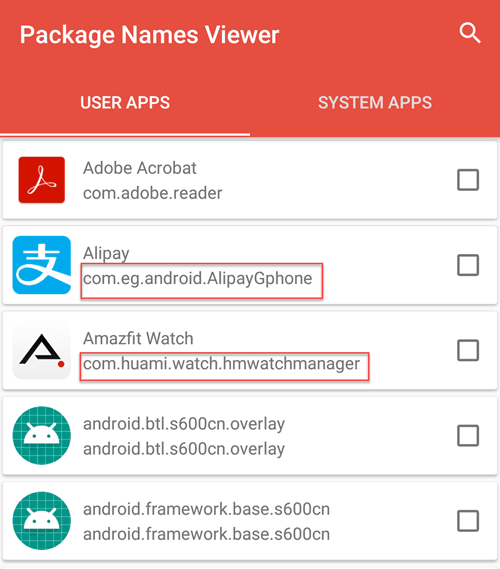
Method 2 – Use an app on your phone
Trying to find the package name of an app installed on your device? Or the app is installed from a 3rd party source, then you can rely on the Package Viewer apps available on Play Store. We are using a well-known app called Package name viewer 2.0 for this tutorial.
- Install Package Name Viewer 2.0 from the Play Store.
- Scroll through the app list to find the app for which you need the package name. You can also use the search button to quickly look for a particular application or game.
- The package name is listed just under the name of app. Just tap on the app name to get more options like copy.
Package Structure in Android Studio
In Android Studio, the modern day Android App package structure has changed a little bit, but the change is very subtle.
Here is a list of folders created, when you create an Android App project in Android Studio and see it in Project View Mode:
-
app
- build
- libs
-
src
- androidTest
-
main
- java
- res
- AndroidManifest.xml
- gradle
NOTE: The packages which are written in bold font are important packages.
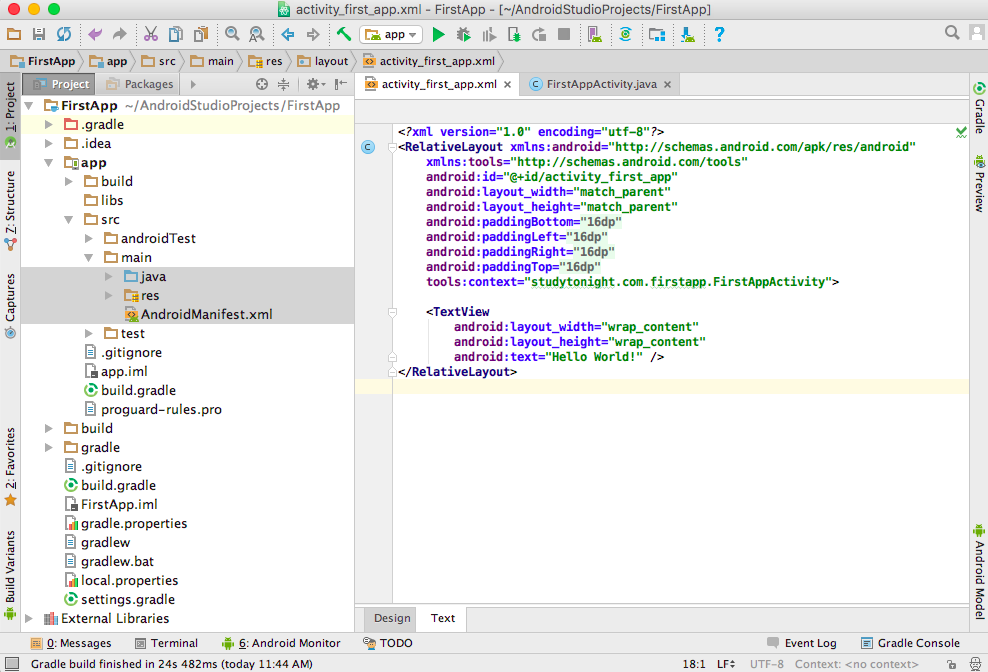
src folder
The src folder holds two most important folders on any Android project, namely, androidTest and main.
The androidTest package is created to hold Test cases for testing the application code and running.
While the main folder, has 2 folders and 1 file. They are:
-
javadirectory
This folder contains .java (JAVA) files. Here, you can create interface(s), activity(s), fragment(s) or adapter(s) for your application. This folder contains java code only. You can create separate packages for each of these and create classes inside them to give your application project a well defined structure.
AndroidManifest.xml
This file is a mandatory file for any android application. In this file we provide information about all the application’s Activities, Services, Broadcast Receivers etc and all the permissions like Internet, Contacts, Camera etc that our application will require when it is installed on any device. Just keep in mind that this file is the heart of any Android Application.
res directory
This folder contains all the resources like icons, images etc related to our application project and it contains the following sub-folders:
This folder contains xml, png, jpg and jpeg files. In this folder you can store images which are used in your app and other .xml files which are used for many purposes like creating button background, or shadow effect etc.
This folder contain only the layout .xml files for different screens and parts of your application.
This folder contains default files like strings.xml , dimens.xml , colors.xml , styles.xml .
- In strings.xml, you can specify all the string constants like title of screen or any other tag which are constantly used in your app.
- In dimens.xml, you can create different .xml files to define dimensions as per resolution of screen and dimension of it and give any dimensions for padding, height, width, margin in this file.
- In color.xml you can mention the list of colors using their hashcodes, used in your application. If this is not created by default, you can create this yourself.
- In styles.xml you can define different readymade styles to use them directly anywhere in your Android App.
build Folder
This folder contain R.java file, which is an auto generated file. This file indexes all the resources of the android application project like layout xml, strings xml etc and it is auto generated.
In build folder, you will have application’s debug and release apk files, created when you build your project.
libs folder
If you want to use any external library, all you have to do is copy-paste the .jar file into the libs folder and then you can directly use it in you .java code files.
gradle folder
In this folder there are files related to gradle which can be modified to alter the project building process. For example: If you wish to run all the available test cases before building the .apk file, you can do so by mentioning it in the gradle file.
So now you know about the details of each and every ready-made folder of your Android Application project. As we move ahead with the lessons you will get to know more about these folders and types of files that they contain. The upcoming lesson contain information about Gradle(build system for Android Studio).
How to determine the package name of an Android App

Occasionally it’s necessary to know the package name of an Android app. The package name is a unique name to identify a specific app. Generally, the package name of an app is in the format domain.company.application , but it’s completely up to the app’s developer to choose the name. The domain portion is the domain extension, like com or org , used by the developer of the app. The company portion is usually the name of the developer’s company or product. The final application portion usually describes the app itself. This could be one word or multiple words separated by periods.
For example, com.amazon.tv.launcher is the package name of the Fire TV’s home screen launcher app, org.xbmc.kodi is the package name for Kodi, and eu.bandainamcoent.pacman256 is the package name of the PAC-MAN 256 game released by the European division of Bandai Namco Entertainment. This guide will show you several ways to determine the package name of an app.
Method 1: Using AAPT with the APK file
If you have the APK on your PC, you can use AAPT to retrieve the APK’s package name. AAPT is one of the command line utilities that come with the Android SDK. Open a command line and enter aapt.exe dump badging [path-to-apk] if you’re using Windows, or aapt dump badging [path-to-apk] if you’re using a Mac or Linux. Be sure to replace [path-to-apk] with the full path to the APK file on your PC. A lot of information about the APK file will be printed, but near the top will be an area that says something like package: name=’org.xbmc.kodi’
Method 2: Using ADB if the app is already installed
If the app is already installed on your Fire TV or other Android device, you can run a shell command that lists all the apps, with their package names, that are installed on your device. First, connect to your device via ADB, then run the command adb shell pm list packages -3 -f . That will list all the apps you’ve personally installed on the device. If you want to see a list of all the apps, including system apps, then run the command adb shell pm list packages -f instead. Each line of the app list that is displayed will end in the app’s package name. For example, package:/data/app/org.xbmc.kodi-1/base.apk=org.xbmc.kodi is the line for Kodi. The package name should be descriptive enough for you to be able to pick out the app you’re looking for.
Method 3: Using the Appstore URL or Page
Depending on where you’re downloading the app from, the URL or page may contain the package name. The Google Play Store, for example, puts the package name of the app in the URL after the text id= . Amazon’s appstore used to list the app’s package name as the “Manufacturer reference” label. Amazon also lists the package name as the “Manufacturer Part Number (MPN)” when you query their API for product information of an app. The above methods are sure fire ways to retrieve an app’s package name, but the appstore page may also have it listed.
Build and run the application
Now let’s build our application and run it on a virtual device.
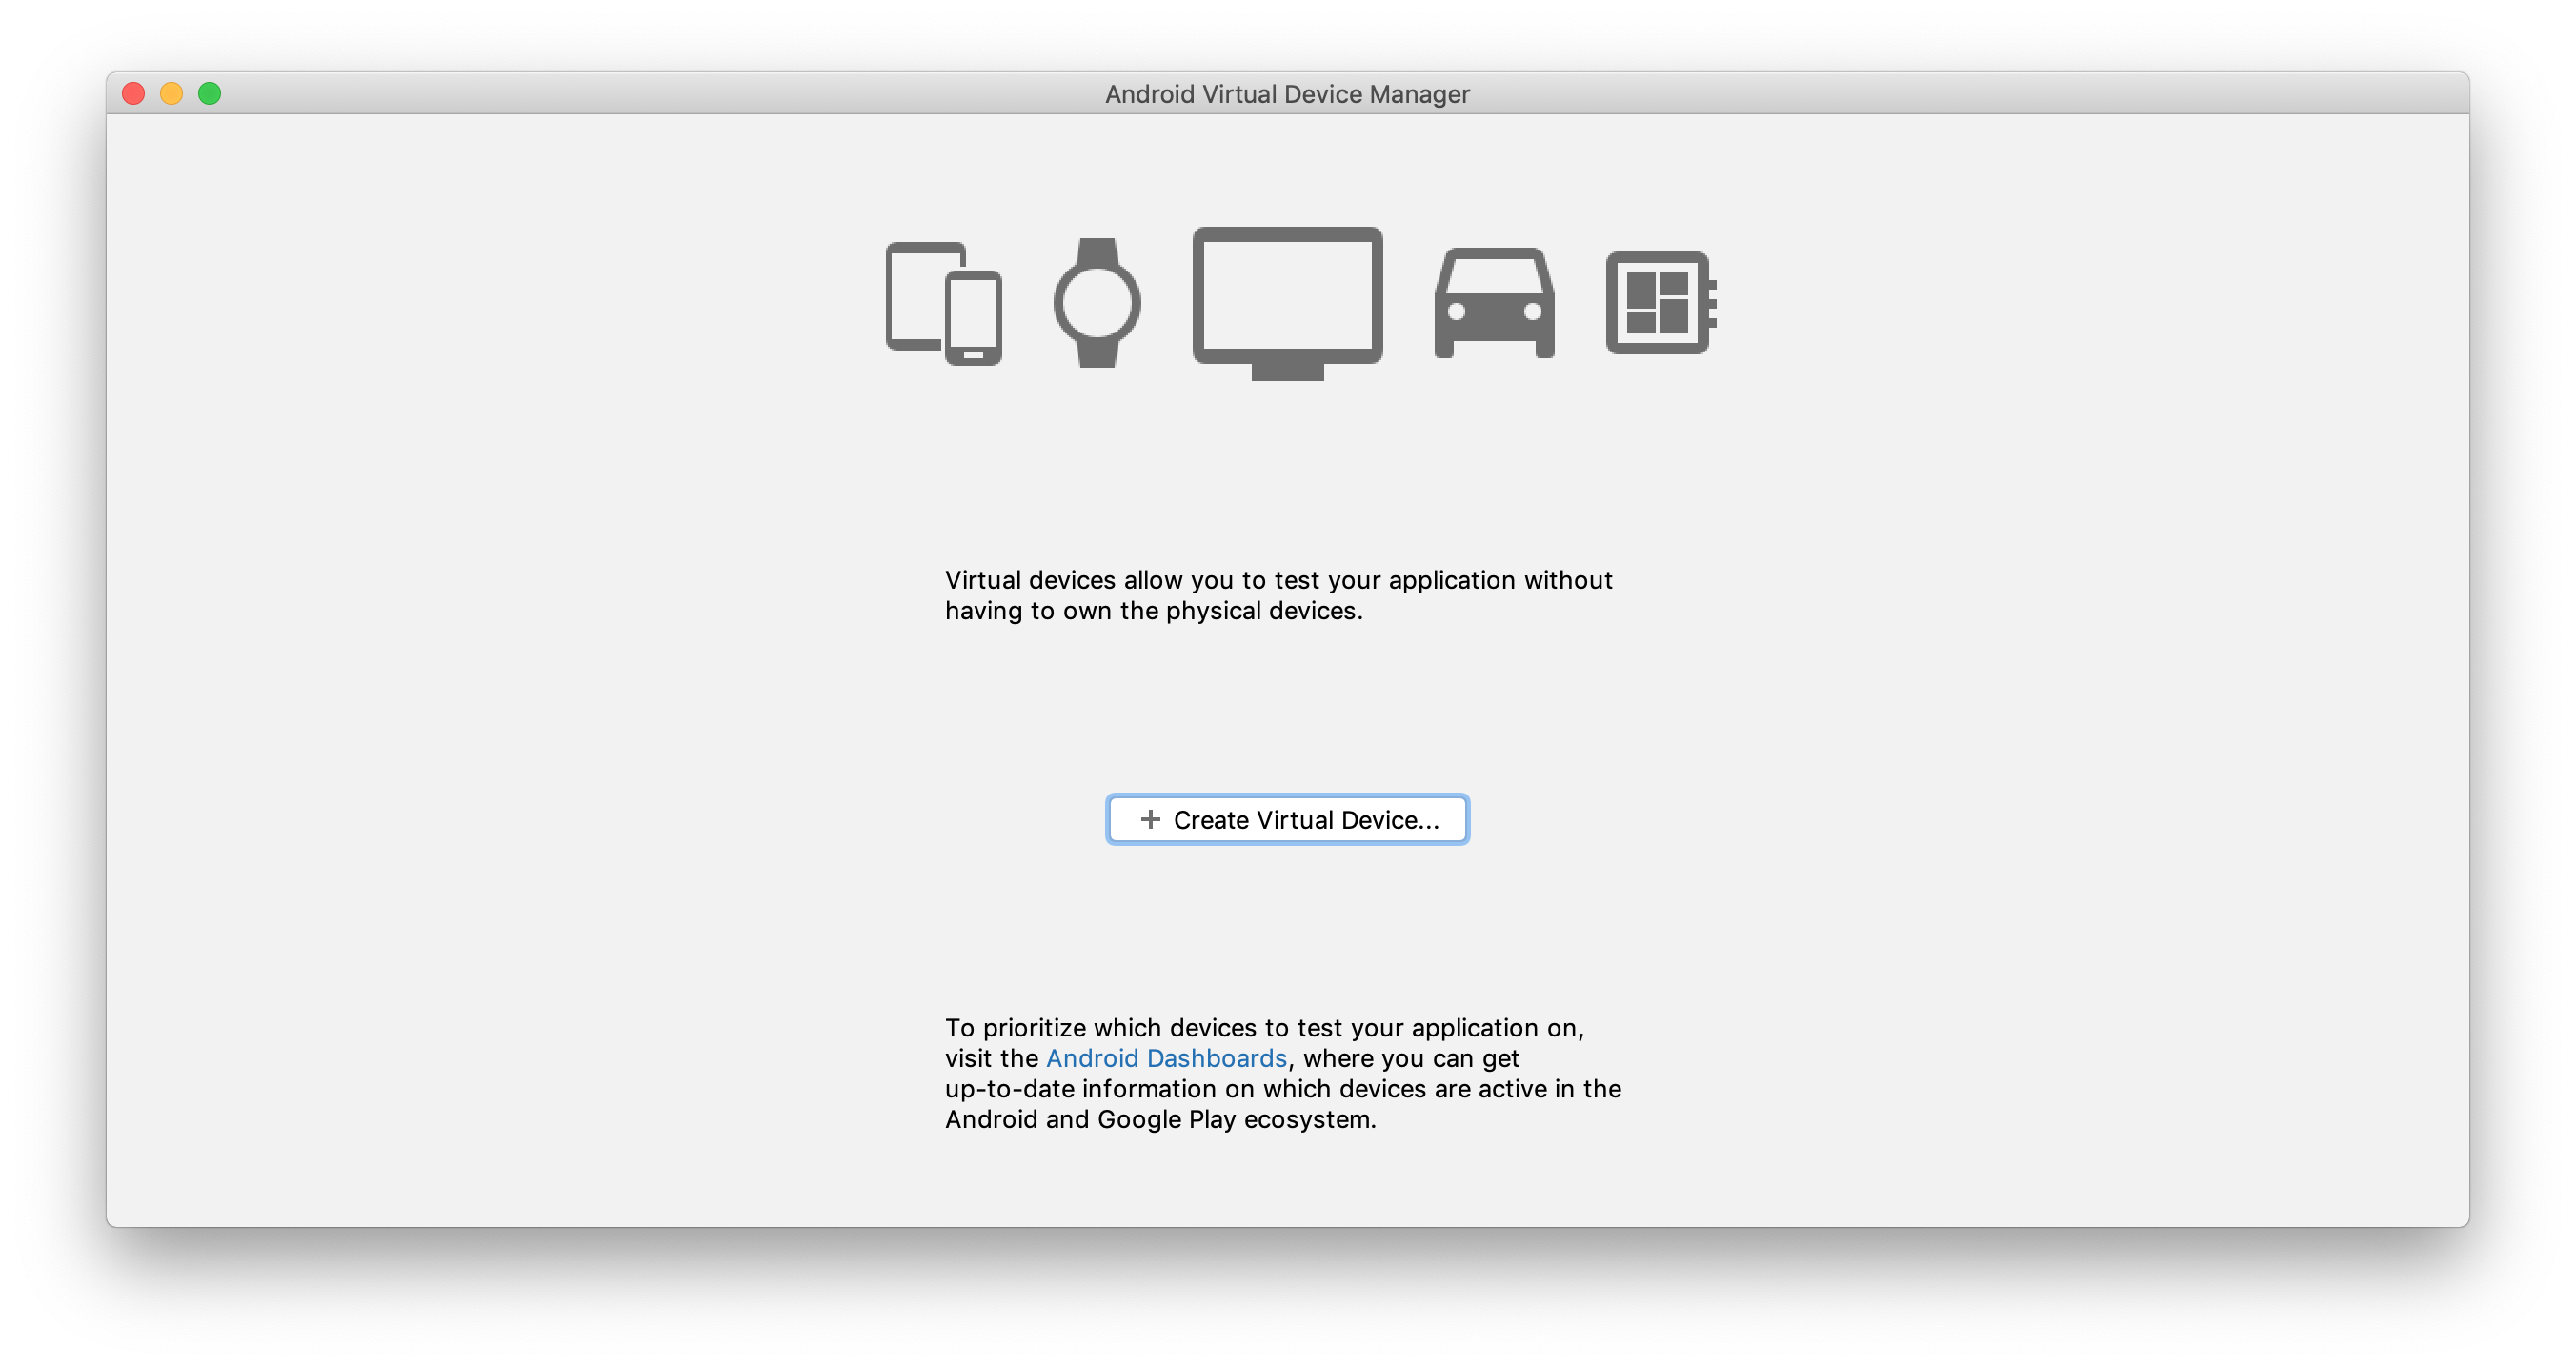
Configure Android virtual device
First of all, to be able to run our application, we need to configure a virtual device.
In the main IntelliJ IDEA toolbar, click the devices list and choose AVD Manager :

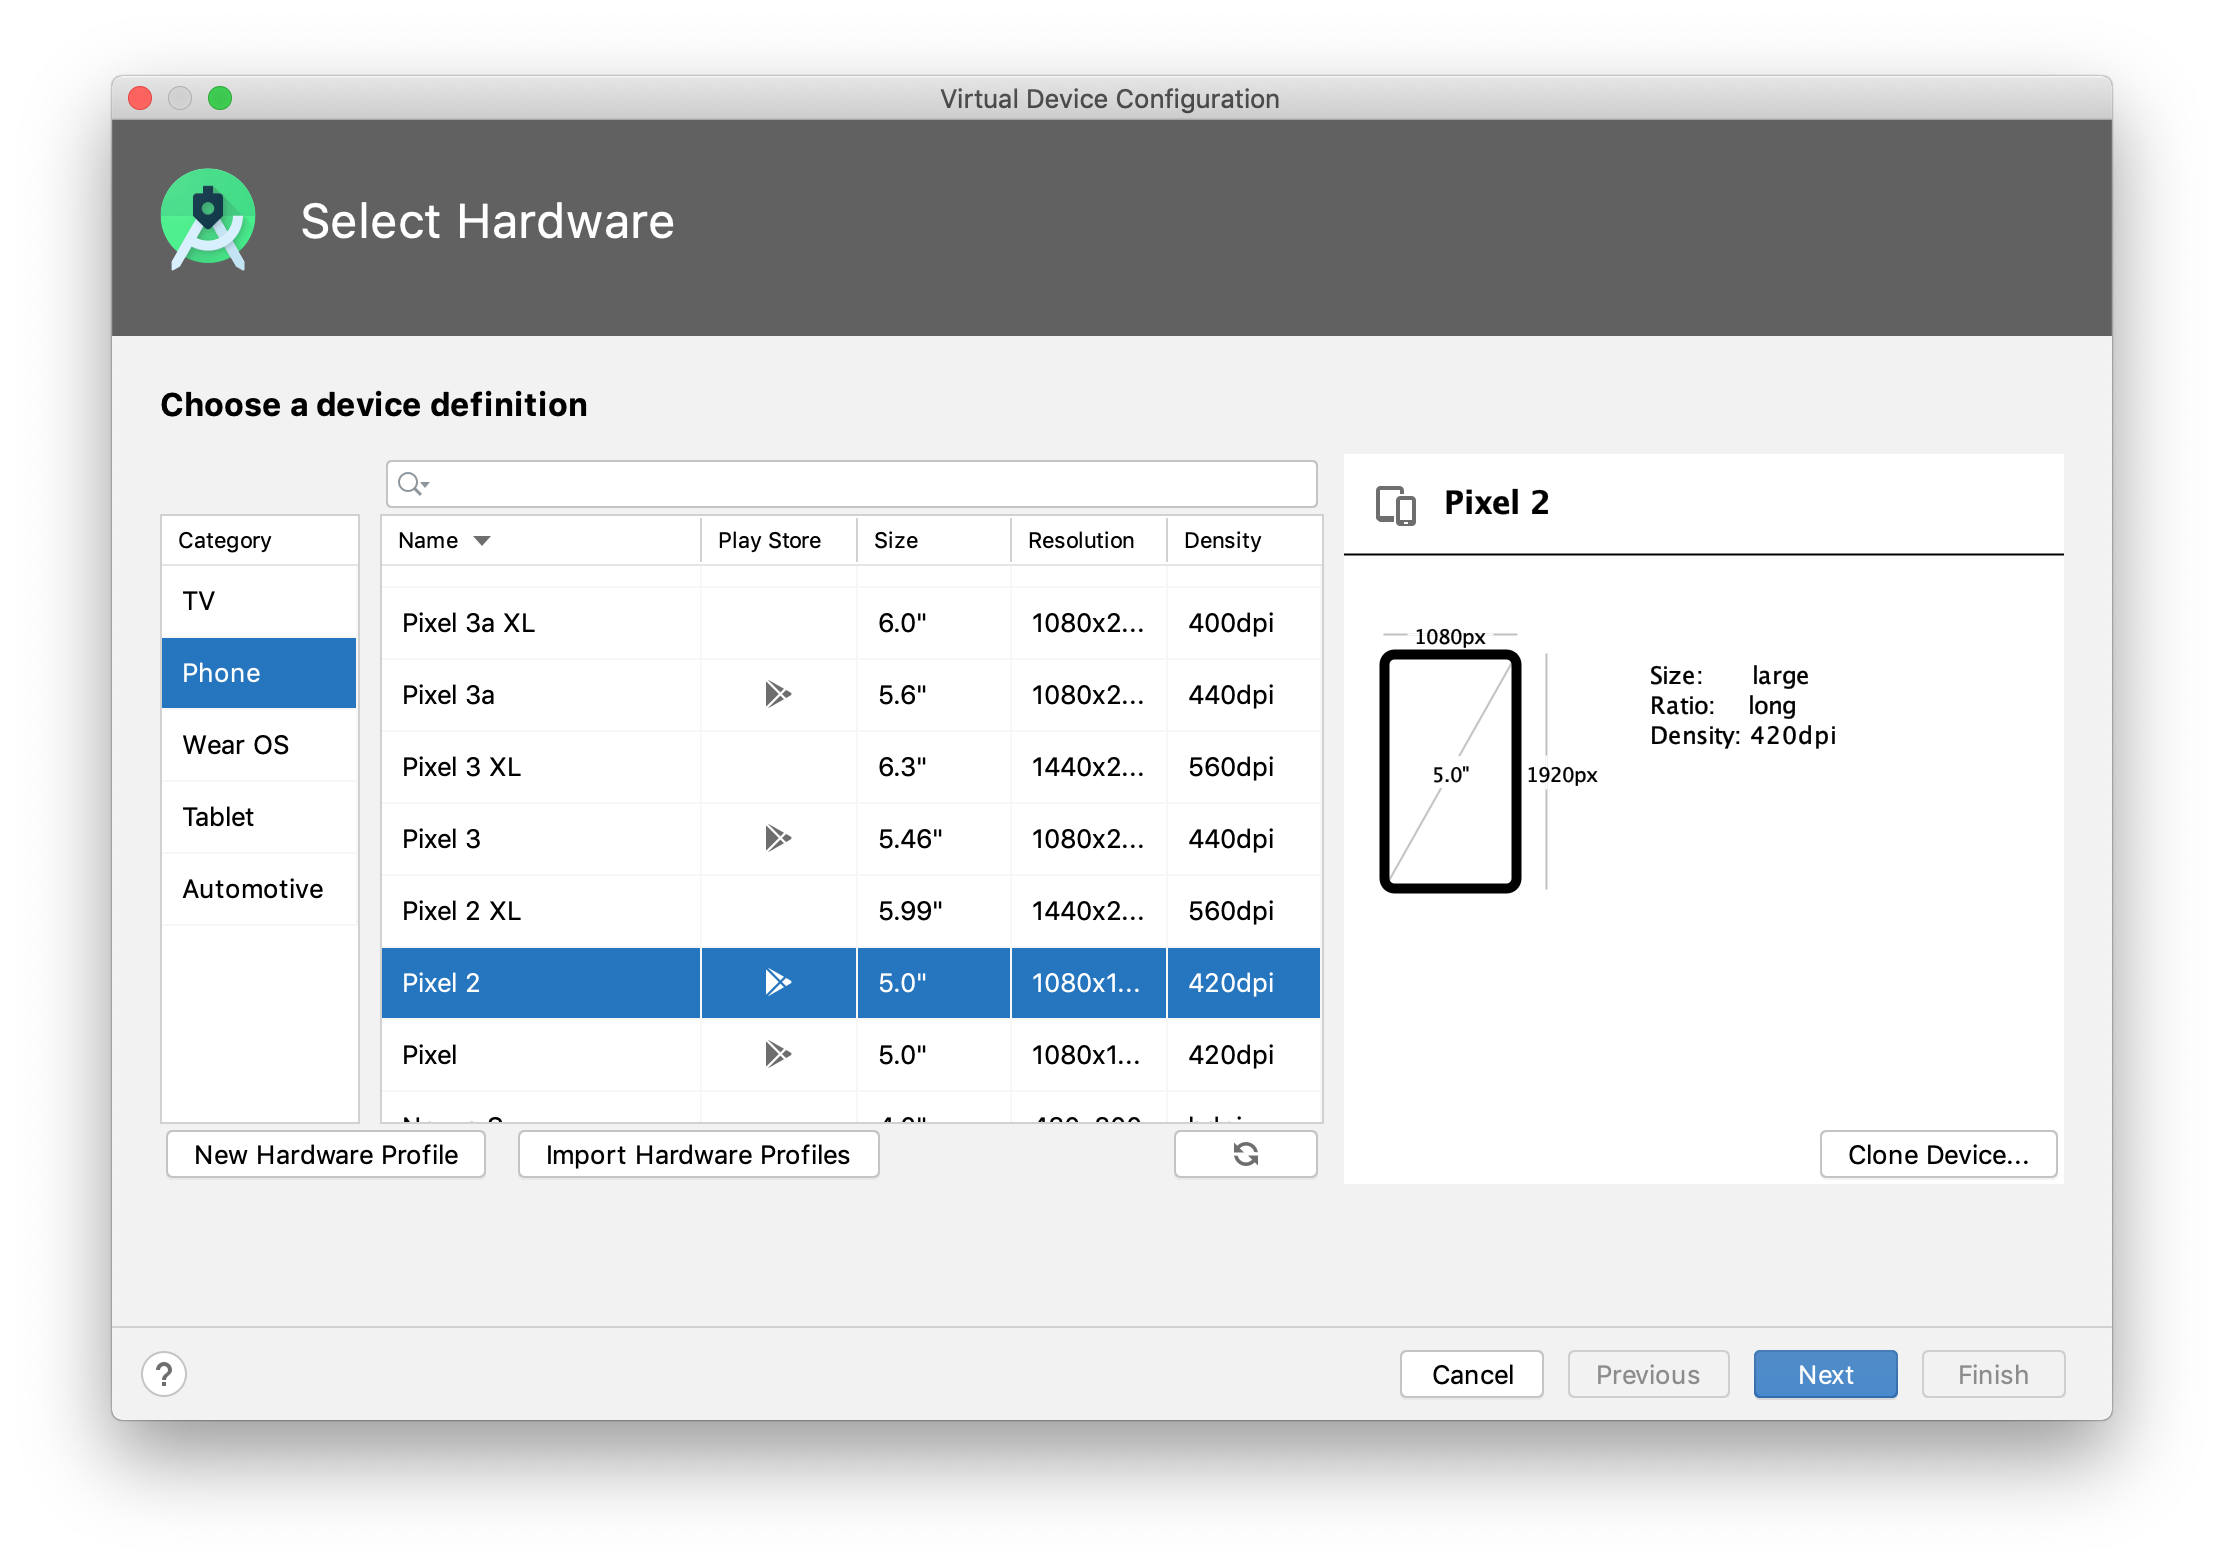
On the first step of the wizard, click Create Virtual Device :
On the next step, we need to select the hardware that our virtual device will emulate.
Let’s select Phone on the left, and choose Pixel 2 as the target device:
Choose the system image you want to mimic on the virtual device, that is the OS version, the Android API level, the application binary interface (ABI), and the target SDK version:
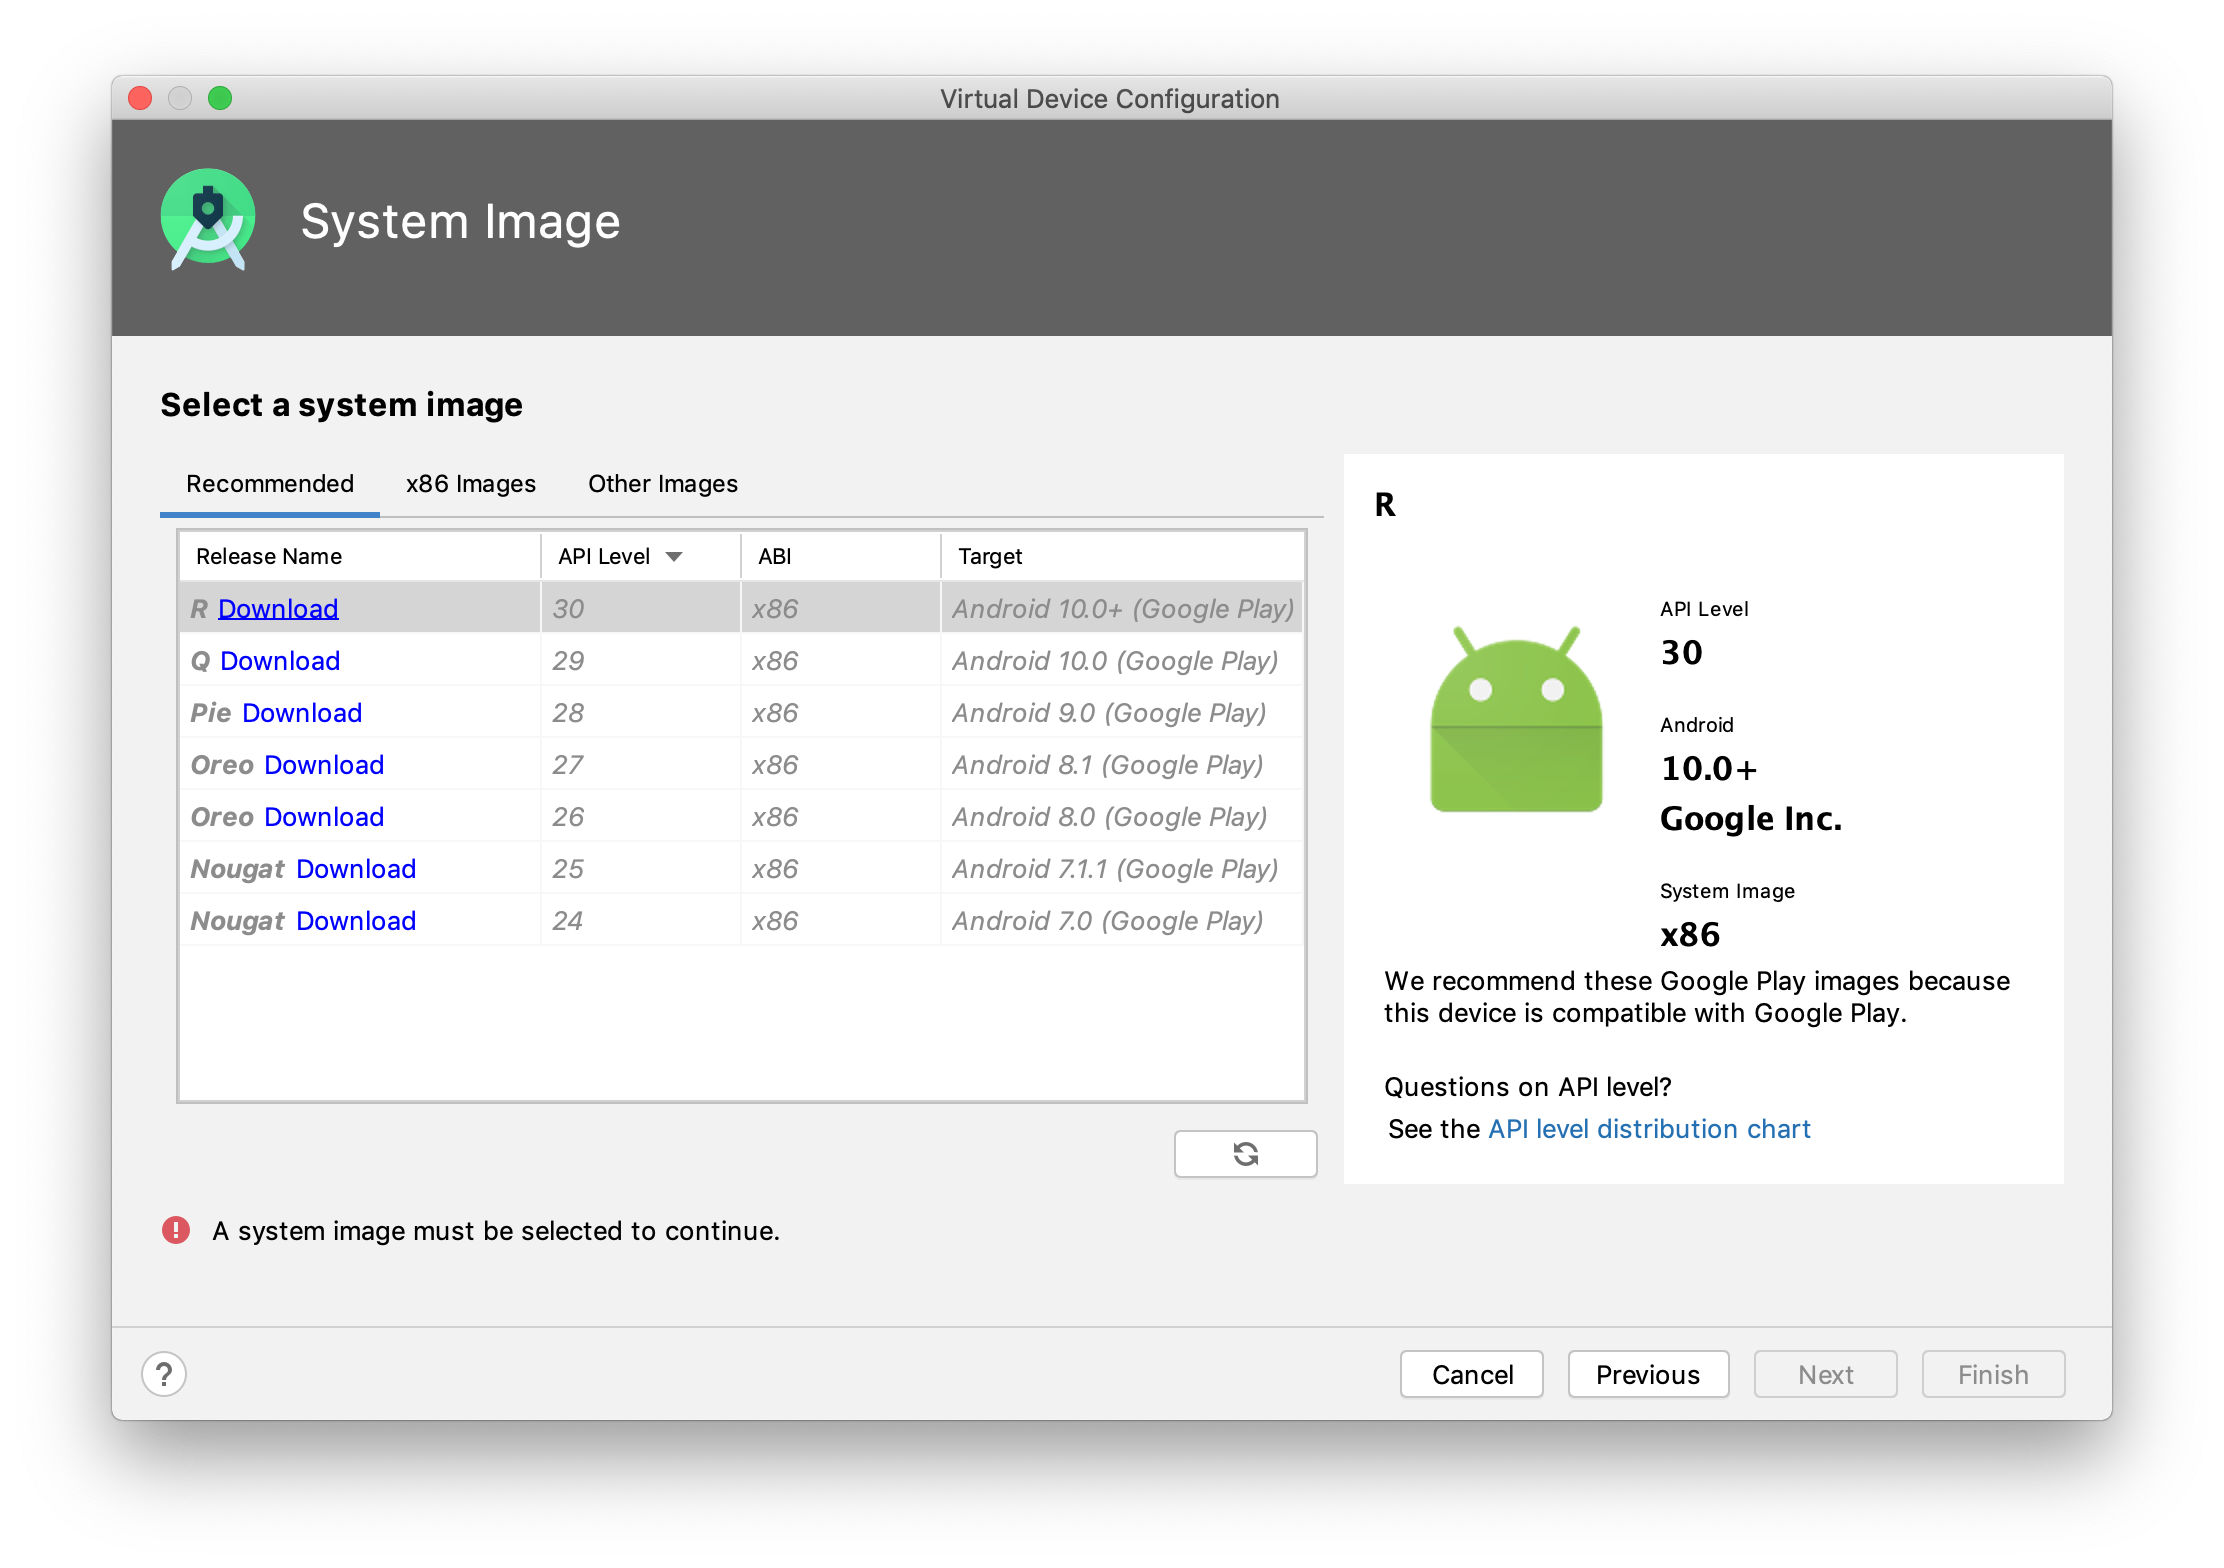
Click the Download link next to the system image you want to mimic on the virtual device. For this tutorial, we’ve chosen to download the R system image.
In the License Agreement dialog that opens, read the license agreement and accept it, then click Next and wait for the download to finish. When the system image has been downloaded, select it and click Next in the System Image step of the wizard.
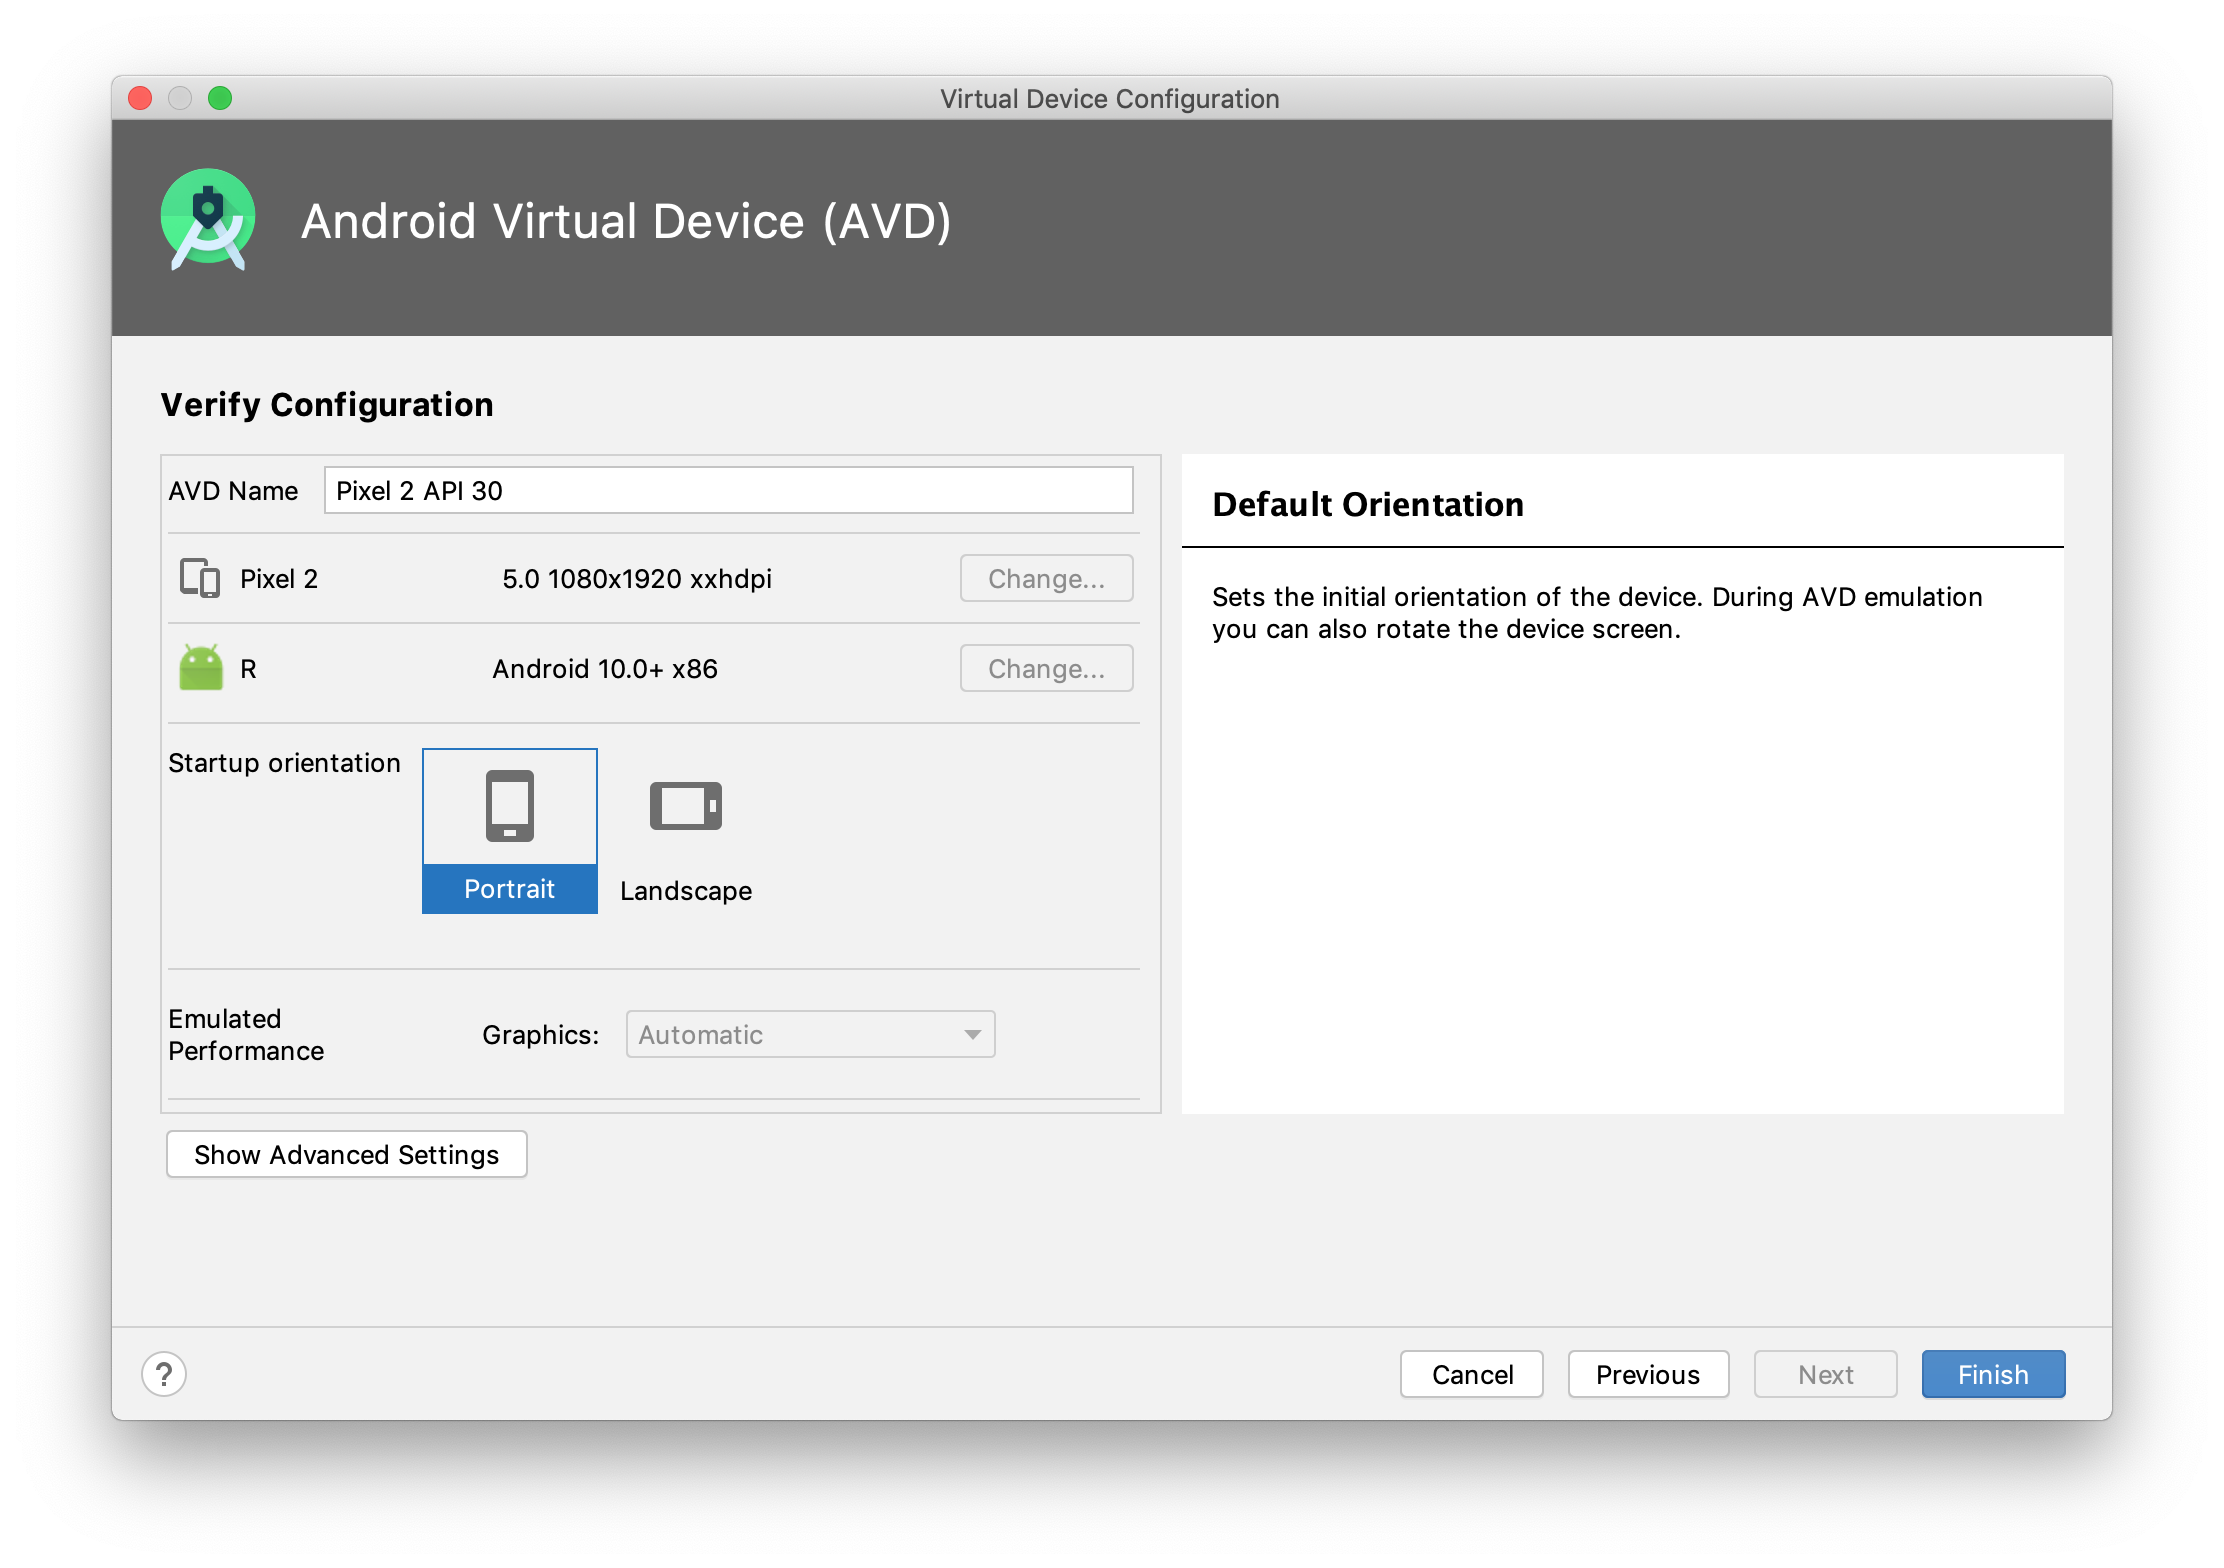
On the last step, you can modify your virtual device name and select the startup size and orientation of the screen. Choose the portrait layout and click Finish :
The newly configured device appears in the Android Virtual Device Manager .
Run the application
On the main IntelliJ IDEA toolbar, make sure the automatically created Run configuration and the virtual device we’ve just configured are selected and click :

The Android emulator will launch after the build has successfully finished, with our application started:

Click the droid image and see how the application processes the tap events, counts them and returns the corresponding message:
Finding the Package Name of Android Apps
There are several ways to find out the package name of an Android app. I am listing down the various methods. You can follow any of them as per your convenience.
Method 1 – From the Play Store
As I mentioned, the Play Store also uses the Android app package name to list unique apps. So, the easiest way to find the app package name is via the Play Store.
On a PC/Mac:
- Open play.google.com in your web browser.
- Use the search bar to look for the app for which you need the package name.
- Open the app page and look at the URL. The package name forms the end part of the URL i.e. after the id=?. Copy it and use it as needed.
Note: Ignore any other information in the URL. It is not a part of the package name.
Do note that it is only applicable to apps which are listed on Play Store. For 3rd party apps, follow one of the alternative methods as listed below.
On Android mobile device
Most Android mobile browsers will redirect you to the Play Store app when you access the website. So, how do you find the package name from Play Store Android app? Here are the steps you can follow:
- Scroll down to the end of the page till you see the (share) button.
- Use it and share the Play Store app link to any service from where you can select and copy text. I usually use messaging without sending it to any recipient.
- The app package name will at the end of the app link which you just shared. Copy it off and use it as needed.
Method 2 – Use an app on your phone
Trying to find the package name of an app installed on your device? Or the app is installed from a 3rd party source, then you can rely on the Package Viewer apps available on Play Store. We are using a well-known app called Package name viewer 2.0 for this tutorial.
- Install Package Name Viewer 2.0 from the Play Store.
- Scroll through the app list to find the app for which you need the package name. You can also use the search button to quickly look for a particular application or game.
- The package name is listed just under the name of app. Just tap on the app name to get more options like copy.
How to determine the package name of an Android App
Occasionally it’s necessary to know the package name of an Android app. The package name is a unique name to identify a specific app. Generally, the package name of an app is in the format domain.company.application , but it’s completely up to the app’s developer to choose the name. The domain portion is the domain extension, like com or org , used by the developer of the app. The company portion is usually the name of the developer’s company or product. The final application portion usually describes the app itself. This could be one word or multiple words separated by periods.
For example, com.amazon.tv.launcher is the package name of the Fire TV’s home screen launcher app, org.xbmc.kodi is the package name for Kodi, and eu.bandainamcoent.pacman256 is the package name of the PAC-MAN 256 game released by the European division of Bandai Namco Entertainment. This guide will show you several ways to determine the package name of an app.
Method 1: Using AAPT with the APK file
If you have the APK on your PC, you can use AAPT to retrieve the APK’s package name. AAPT is one of the command line utilities that come with the Android SDK. Open a command line and enter aapt.exe dump badging [path-to-apk] if you’re using Windows, or aapt dump badging [path-to-apk] if you’re using a Mac or Linux. Be sure to replace [path-to-apk] with the full path to the APK file on your PC. A lot of information about the APK file will be printed, but near the top will be an area that says something like package: name=’org.xbmc.kodi’
Method 2: Using ADB if the app is already installed
If the app is already installed on your Fire TV or other Android device, you can run a shell command that lists all the apps, with their package names, that are installed on your device. First, connect to your device via ADB, then run the command adb shell pm list packages -3 -f . That will list all the apps you’ve personally installed on the device. If you want to see a list of all the apps, including system apps, then run the command adb shell pm list packages -f instead. Each line of the app list that is displayed will end in the app’s package name. For example, package:/data/app/org.xbmc.kodi-1/base.apk=org.xbmc.kodi is the line for Kodi. The package name should be descriptive enough for you to be able to pick out the app you’re looking for.
Method 3: Using the Appstore URL or Page
Depending on where you’re downloading the app from, the URL or page may contain the package name. The Google Play Store, for example, puts the package name of the app in the URL after the text id= . Amazon’s appstore used to list the app’s package name as the “Manufacturer reference” label. Amazon also lists the package name as the “Manufacturer Part Number (MPN)” when you query their API for product information of an app. The above methods are sure fire ways to retrieve an app’s package name, but the appstore page may also have it listed.
What is the Android Application Package?
Android Application Package (APK) can be understood as a package file format of Android Applications. These files are analogous to the many other software packages. These packages include APPX in MicroSoft Windows or you can consider Deb packages in Debian based OS like Ubuntu. As we know that any Android Application is built using the four very important components. The two of those components that are Activities and Services. Let us recall what Activities and Services are-
An Activity is that application component which provides a visible screen that helps the users interact with it to perform some operations. For example whatever you see as soon as you open an app, like upon opening the Call logs you see the recent calls. You can know more about Activities.
On the other hand, Services are those part of an application that helps the app to perform long run operations. These are generally performed in the background and do not need the user interference. For example the songs playing in the background. Or some updation going on in the background. Learn more about Android Services.
Package Structure in Android Studio
In Android Studio, the modern day Android App package structure has changed a little bit, but the change is very subtle.
Here is a list of folders created, when you create an Android App project in Android Studio and see it in Project View Mode:
-
app
- build
- libs
-
src
- androidTest
-
main
- java
- res
- AndroidManifest.xml
- gradle
NOTE: The packages which are written in bold font are important packages.
src folder
The src folder holds two most important folders on any Android project, namely, androidTest and main.
The androidTest package is created to hold Test cases for testing the application code and running.
While the main folder, has 2 folders and 1 file. They are:
-
javadirectory
This folder contains .java (JAVA) files. Here, you can create interface(s), activity(s), fragment(s) or adapter(s) for your application. This folder contains java code only. You can create separate packages for each of these and create classes inside them to give your application project a well defined structure.
AndroidManifest.xml
This file is a mandatory file for any android application. In this file we provide information about all the application’s Activities, Services, Broadcast Receivers etc and all the permissions like Internet, Contacts, Camera etc that our application will require when it is installed on any device. Just keep in mind that this file is the heart of any Android Application.
res directory
This folder contains all the resources like icons, images etc related to our application project and it contains the following sub-folders:
This folder contains xml, png, jpg and jpeg files. In this folder you can store images which are used in your app and other .xml files which are used for many purposes like creating button background, or shadow effect etc.
This folder contain only the layout .xml files for different screens and parts of your application.
This folder contains default files like strings.xml , dimens.xml , colors.xml , styles.xml .
- In strings.xml, you can specify all the string constants like title of screen or any other tag which are constantly used in your app.
- In dimens.xml, you can create different .xml files to define dimensions as per resolution of screen and dimension of it and give any dimensions for padding, height, width, margin in this file.
- In color.xml you can mention the list of colors using their hashcodes, used in your application. If this is not created by default, you can create this yourself.
- In styles.xml you can define different readymade styles to use them directly anywhere in your Android App.
build Folder
This folder contain R.java file, which is an auto generated file. This file indexes all the resources of the android application project like layout xml, strings xml etc and it is auto generated.
In build folder, you will have application’s debug and release apk files, created when you build your project.
libs folder
If you want to use any external library, all you have to do is copy-paste the .jar file into the libs folder and then you can directly use it in you .java code files.
gradle folder
In this folder there are files related to gradle which can be modified to alter the project building process. For example: If you wish to run all the available test cases before building the .apk file, you can do so by mentioning it in the gradle file.
So now you know about the details of each and every ready-made folder of your Android Application project. As we move ahead with the lessons you will get to know more about these folders and types of files that they contain. The upcoming lesson contain information about Gradle(build system for Android Studio).

