

Apps Backup and Restore 1.3.4
Содержание
-
1 Apps Backup and Restore 1.3.4
-
1.1 4.1.3. Backup and Restore Management
- 1.1.1 Why should I backup my data
- 1.1.2 Limitations of backup and restore features
- 1.1.3 How to backup my data on BlueStacks
- 1.1.4 How to restore my backup data
- 1.1.5 Why should I backup my data
- 1.1.6 Limitations of backup and restore features
- 1.1.7 How to backup my data on BlueStacks
- 1.1.8 How to restore my backup data
- 1.2 4.1.3. Backup and Restore Management
- 1.3 4.1.3. Backup and Restore Management
-
1.1 4.1.3. Backup and Restore Management
| Function | Outline |
| Backup and Restore | A feature that acquires stores and restores backup images for the purpose of backup. Backup images are stored in a storage device provided by the NTT Communications (called “Backup Storage” below). For restoration, backup images are directly overwritten on the Virtual Server. |
| Backup and Restore Management | A feature that manages backup of the Virtual Server. It is possible to manage the schedule and check the history of backup and restore. |
- All disks for the Virtual Server
- Image Backup does not support Virtual Machine which is over 4,000GB for total disk capacity + the memory resource (different for each Compute Class).
Restore
- The Virtual Server is restored at the state of Power Off. The Virtual Server needs to be manually started.
| Item | Description of setting |
| vCPU | Restores the configuration of the Virtual Server targeted for backup. |
| Memory | Restores the configuration of the Virtual Server targeted for backup. |
| Disk | Restores the configuration of the Virtual Server targeted for backup. |
| vNIC | Restores the vNIC information of the Virtual Server targeted for backup (IP address, net mask, Mac address). |
- For various settings of Guest OS, settings of the Virtual Server targeted for backup are restored, but some setting items including default GW, subnet mask and DNS are not backed up. For details, refer to “ Guest OS Customization ”.
- The “change S-ID” (Sysprep) that is normally performed while using Windows is not performed.
4.1.3. Backup and Restore Management
| Name | Description |
| Effective flag (Schedule) | It is possible to enable or disable this backup job. |
| Job history (Scheduled jobs) | It is possible to select the job from the schedule configured in the past or configure a new schedule. If the job is selected from the schedule configured in the past, the configured contents are adopted. |
| Schedule type | It is possible to select the spot (One-Time), daily, weekly and monthly backup time. |
| Retention period | You can decide the retention period for the acquired backup image. Retention period varies depending on schedule type. |
| Date | You can specify the date from when backup starts. For spot, daily and monthly backup, the start date can be configured. For the weekly backup, the starting day of week can be configured. For the monthly backup, the third Monday can be configured. |
| Time slot | 24 hours can be specified in units of 1 hour. |
| Backup time | Either image backup or file backup can be selected. |
- While the effective flag is disabled, backup does not start.
- Time slot is the estimate of the time when backup starts so that time is not guaranteed.
- Setting the retention period, date and time slot for each schedule type
This article will help you understand how to easily backup and restore your data on BlueStacks.
The Backup feature saves a copy of all your BlueStacks related data, apps and files, which are present at the time of taking the backup. You can then restore the backed up copy later, using the Restore feature.
The backup is saved on your computer at a location of your choice and is created at a certain point in time. You may install more apps thereafter.
This detailed guide will explain the following:
Why should I backup my data
- Taking a backup will save your important files and installed apps on BlueStacks against unwanted incidents, such as system files becoming corrupt, system crash, hard drive failure or power outage.
- For maximum protection, make sure to backup your data frequently and regularly.
Limitations of backup and restore features
- You may lose your progress in the app if that app data is not synced with the server and is stored locally on the BlueStacks app player. It is highly recommended that you log in using at least one of your social media accounts in the game to avoid this from happening.
- When you restore your data, the apps installed on BlueStacks after the backup was created will not be restored. It is advised to take a backup of your data frequently to protect all of your data.
How to backup my data on BlueStacks
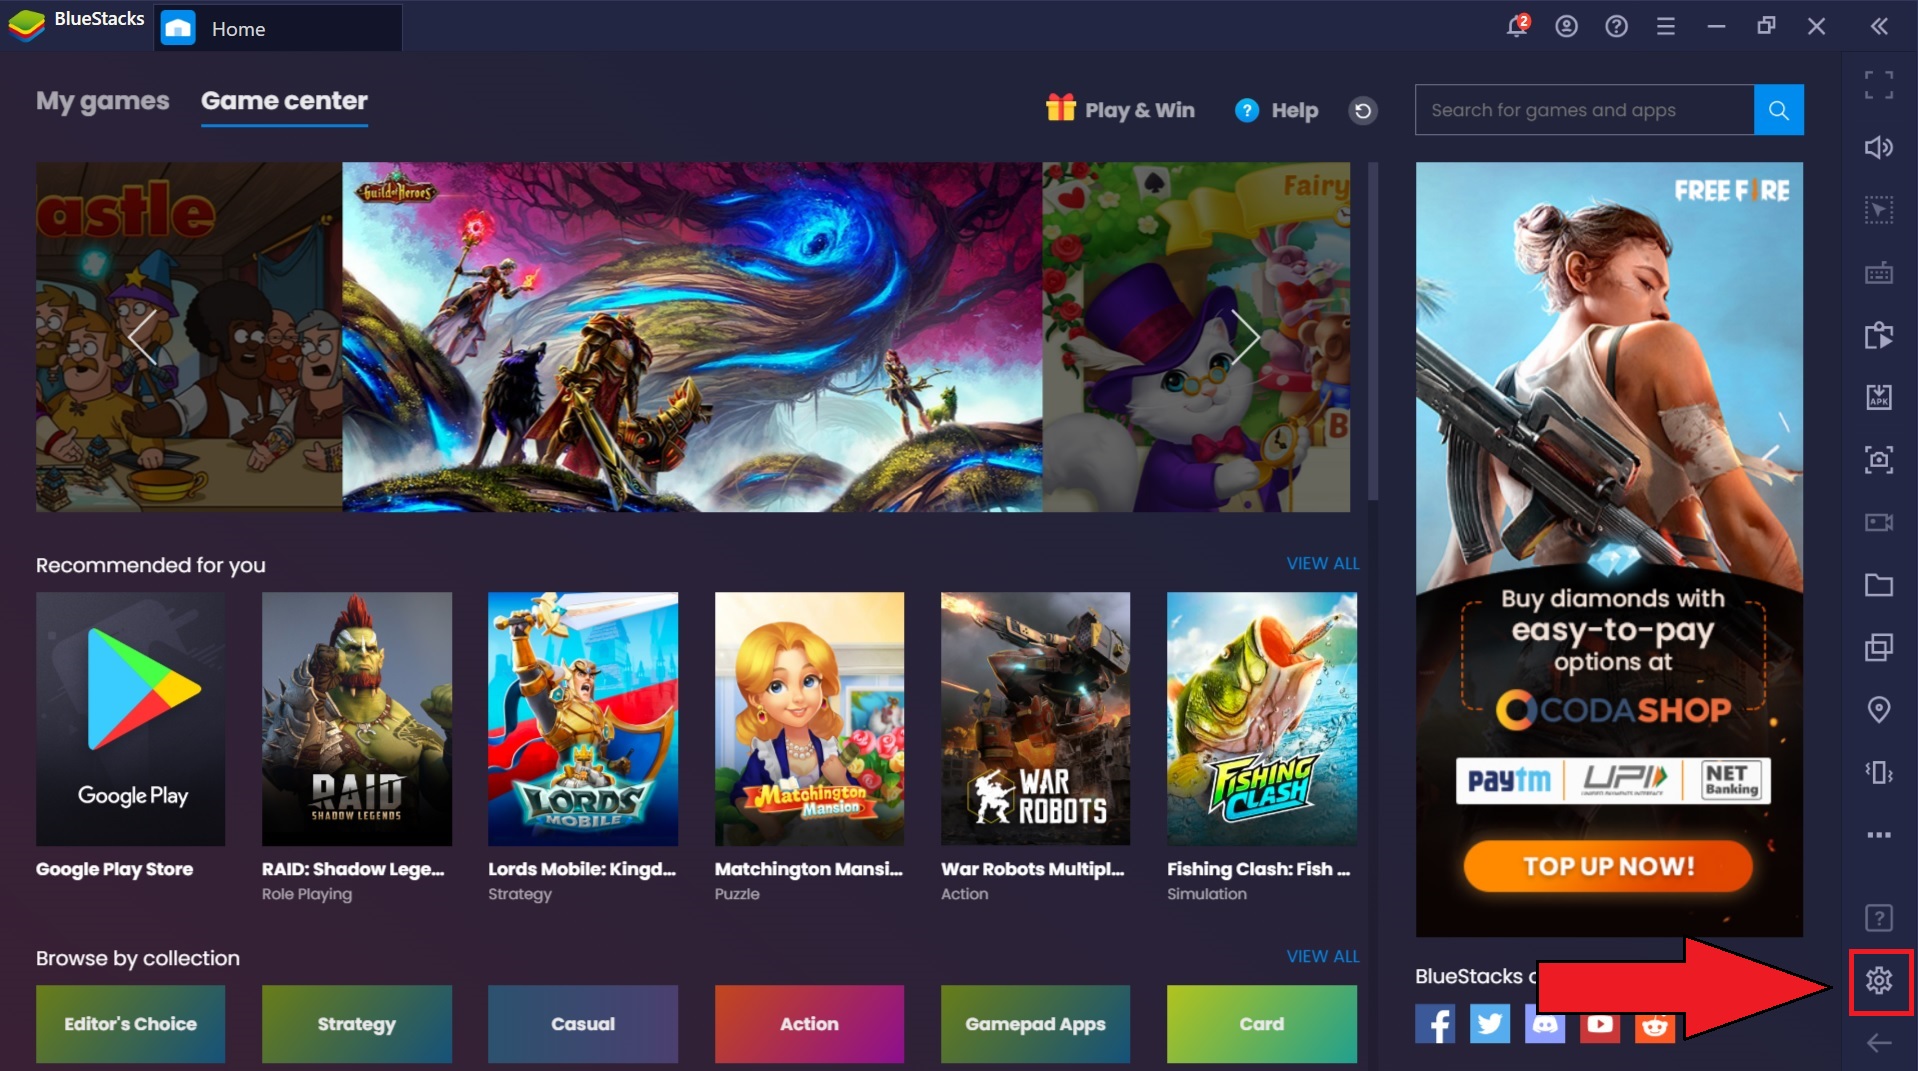
1. Launch BlueStacks. Click on the gear icon on the side toolbar, as shown below.

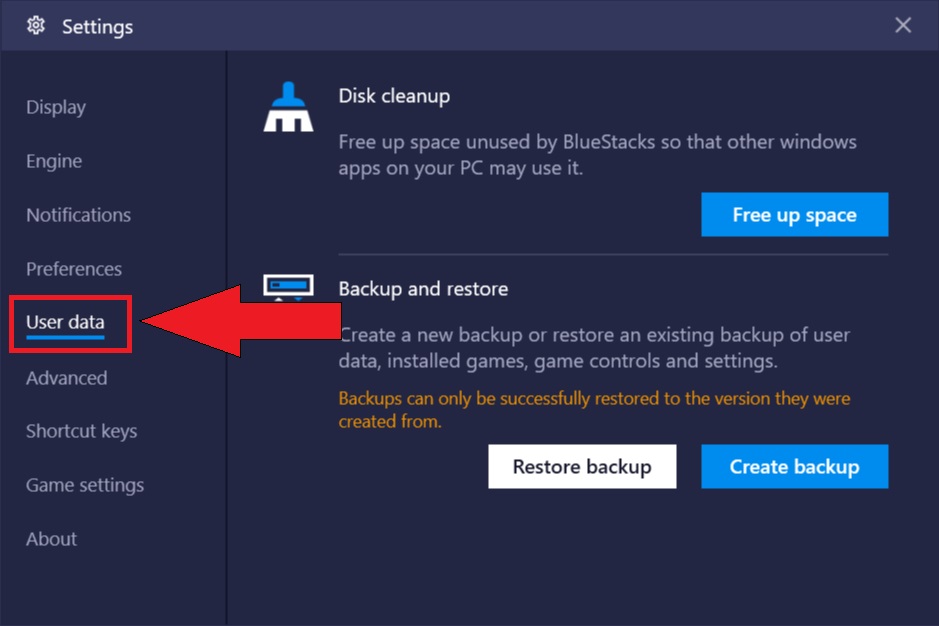
2. It will open the Settings window. Here, select the User data tab.

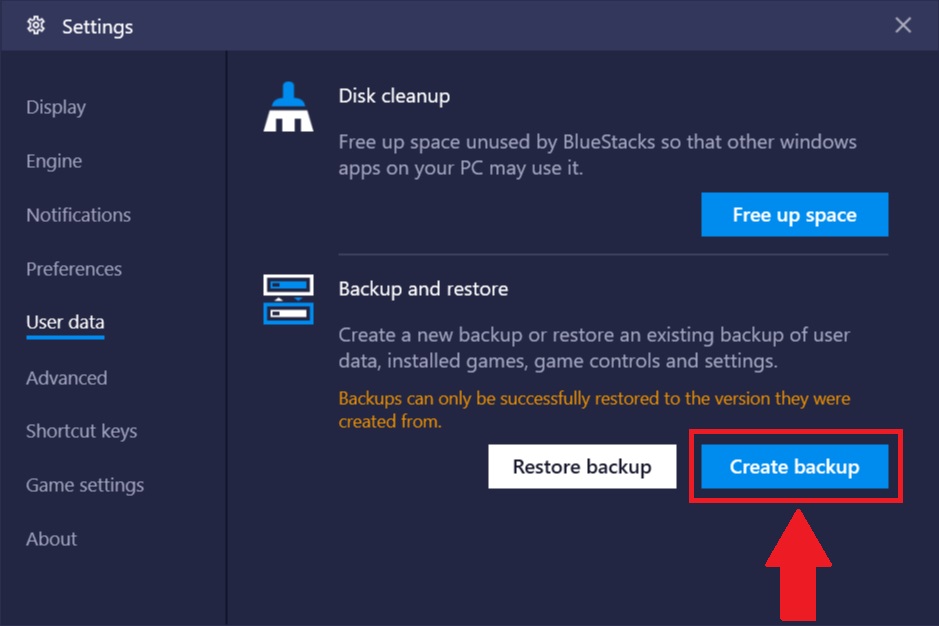
3. Now, you will the Backup and restore section. To create a backup of your current apps and files on BlueStacks, click on Create backup.
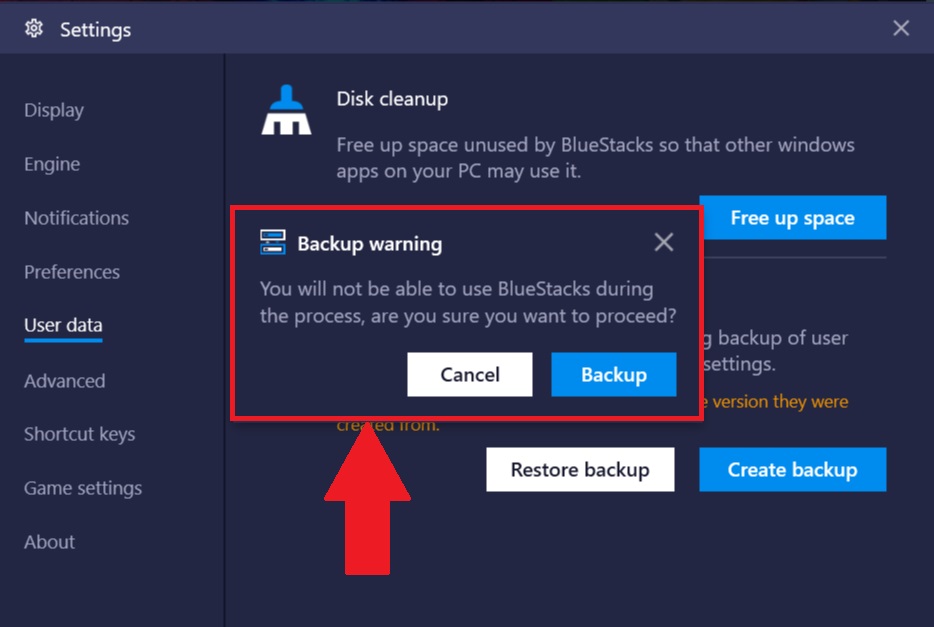
4. You will then get a confirmation box. Proceed with the backup process by clicking on Backup or click on Cancel to abort.
Note: You will not be able to use BlueStacks while the backup is in progress.
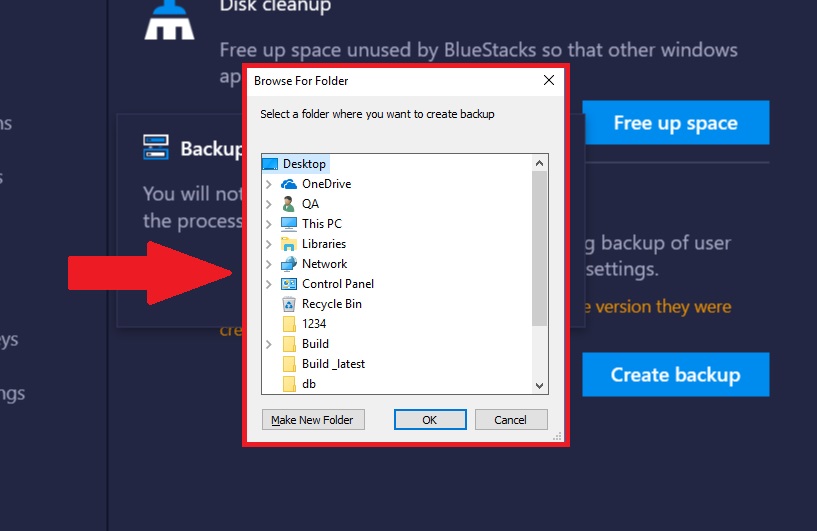
5. Upon clicking on Backup, you will be asked to select the location where you want to save the backup copy. For illustration, we chose «Desktop» as shown in the screenshot below.
After choosing the location, click on OK.
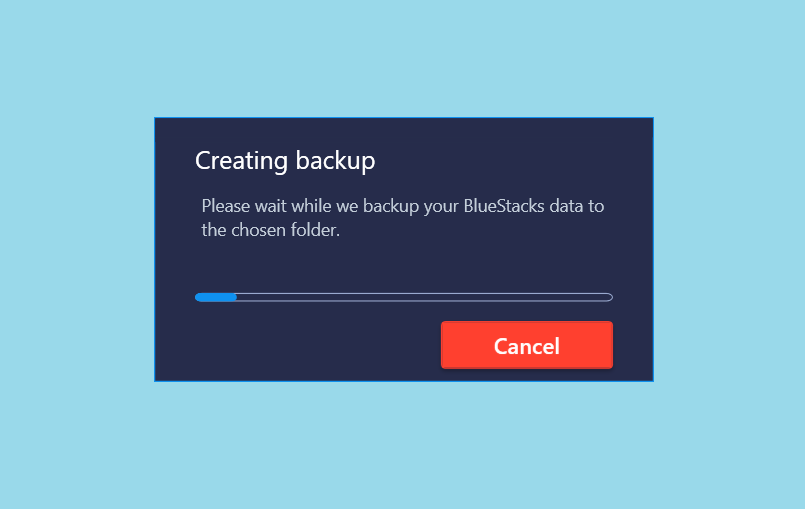
6. The backup process will then start. Progress of backup creation can be seen as shown below.
How to restore my backup data
1. Click on the gear icon on the bottom of the sidebar, as shown in the image.
2. It will open the Settings window. Here, select the User data tab.
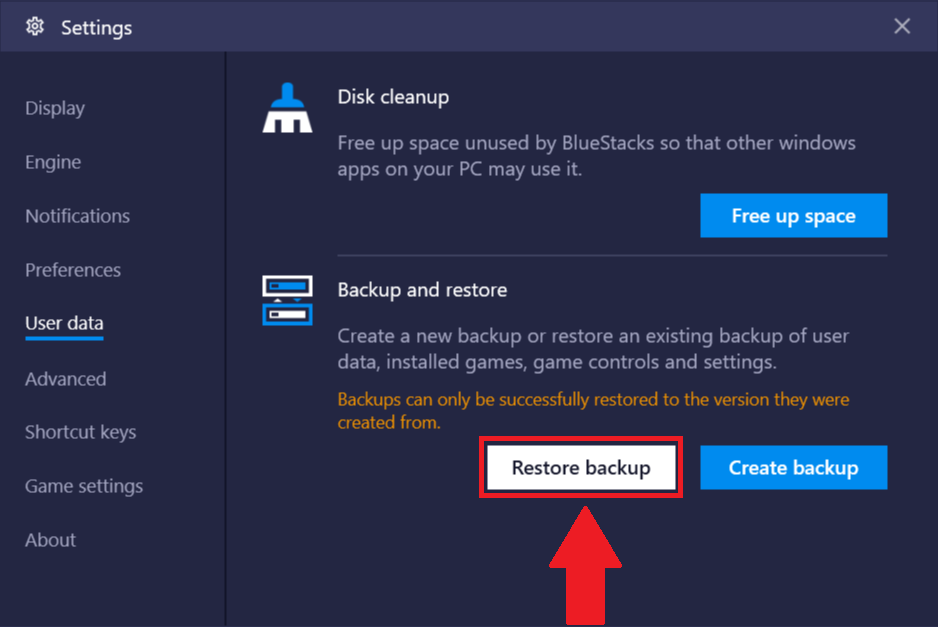
3. Now, you will the Backup and restore section. To restore a backup copy, click on «Restore backup.«
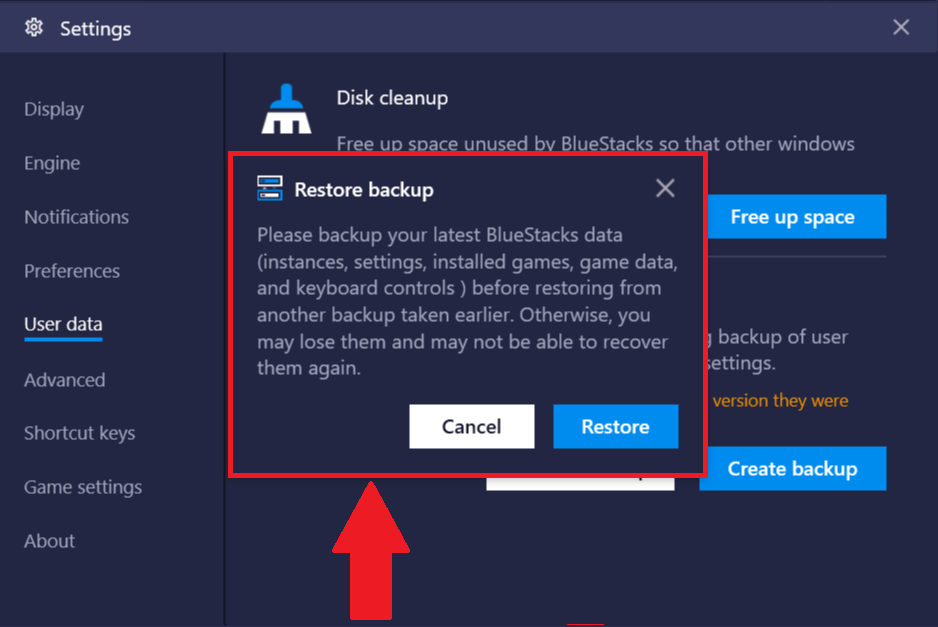
4. You will now get a confirmation box, asking you to backup your existing data before proceeding with the restoration process. Click on Restore to start restoring your data from a backup copy that was created at an earlier time.
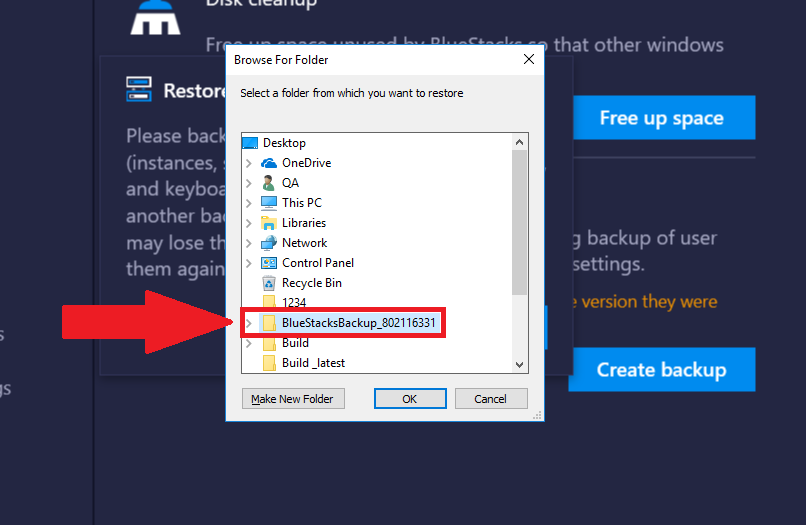
5. Upon clicking Restore, you will be asked for the location of your saved backup. Please select the correct folder and click on OK.
6. The progress of restoring backup can be seen as shown below.
This article will help you understand how to easily backup and restore your data on BlueStacks.
The Backup feature saves a copy of all your BlueStacks related data, apps and files, which are present at the time of taking the backup. You can then restore the backed up copy later, using the Restore feature.
The backup is saved on your computer at a location of your choice and is created at a certain point in time. You may install more apps thereafter.
This detailed guide will explain the following:
Why should I backup my data
- Taking a backup will save your important files and installed apps on BlueStacks against unwanted incidents, such as system files becoming corrupt, system crash, hard drive failure or power outage.
- For maximum protection, make sure to backup your data frequently and regularly.
Limitations of backup and restore features
- You may lose your progress in the app if that app data is not synced with the server and is stored locally on the BlueStacks app player. It is highly recommended that you log in using at least one of your social media accounts in the game to avoid this from happening.
- When you restore your data, the apps installed on BlueStacks after the backup was created will not be restored. It is advised to take a backup of your data frequently to protect all of your data.
How to backup my data on BlueStacks
1. Launch BlueStacks. Click on the gear icon on the side toolbar, as shown below.
2. It will open the Settings window. Here, select the User data tab.
3. Now, you will the Backup and restore section. To create a backup of your current apps and files on BlueStacks, click on Create backup.
4. You will then get a confirmation box. Proceed with the backup process by clicking on Backup or click on Cancel to abort.
Note: You will not be able to use BlueStacks while the backup is in progress.
5. Upon clicking on Backup, you will be asked to select the location where you want to save the backup copy. For illustration, we chose «Desktop» as shown in the screenshot below.
After choosing the location, click on OK.
6. The backup process will then start. Progress of backup creation can be seen as shown below.
How to restore my backup data
1. Click on the gear icon on the bottom of the sidebar, as shown in the image.
2. It will open the Settings window. Here, select the User data tab.
3. Now, you will the Backup and restore section. To restore a backup copy, click on «Restore backup.«
4. You will now get a confirmation box, asking you to backup your existing data before proceeding with the restoration process. Click on Restore to start restoring your data from a backup copy that was created at an earlier time.
5. Upon clicking Restore, you will be asked for the location of your saved backup. Please select the correct folder and click on OK.
6. The progress of restoring backup can be seen as shown below.
4.1.3. Backup and Restore Management
| Name | Description |
| Effective flag (Schedule) | It is possible to enable or disable this backup job. |
| Job history (Scheduled jobs) | It is possible to select the job from the schedule configured in the past or configure a new schedule. If the job is selected from the schedule configured in the past, the configured contents are adopted. |
| Schedule type | It is possible to select the spot (One-Time), daily, weekly and monthly backup time. |
| Retention period | You can decide the retention period for the acquired backup image. Retention period varies depending on schedule type. |
| Date | You can specify the date from when backup starts. For spot, daily and monthly backup, the start date can be configured. For the weekly backup, the starting day of week can be configured. For the monthly backup, the third Monday can be configured. |
| Time slot | 24 hours can be specified in units of 1 hour. |
| Backup time | Either image backup or file backup can be selected. |
- While the effective flag is disabled, backup does not start.
- Time slot is the estimate of the time when backup starts so that time is not guaranteed.
- Setting the retention period, date and time slot for each schedule type
This article will help you understand how to easily backup and restore your data on BlueStacks.
The Backup feature saves a copy of all your BlueStacks related data, apps and files, which are present at the time of taking the backup. You can then restore the backed up copy later, using the Restore feature.
The backup is saved on your computer at a location of your choice and is created at a certain point in time. You may install more apps thereafter.
This detailed guide will explain the following:
Why should I backup my data
- Taking a backup will save your important files and installed apps on BlueStacks against unwanted incidents, such as system files becoming corrupt, system crash, hard drive failure or power outage.
- For maximum protection, make sure to backup your data frequently and regularly.
Limitations of backup and restore features
- You may lose your progress in the app if that app data is not synced with the server and is stored locally on the BlueStacks app player. It is highly recommended that you log in using at least one of your social media accounts in the game to avoid this from happening.
- When you restore your data, the apps installed on BlueStacks after the backup was created will not be restored. It is advised to take a backup of your data frequently to protect all of your data.
How to backup my data on BlueStacks
1. Launch BlueStacks. Click on the gear icon on the side toolbar, as shown below.
2. It will open the Settings window. Here, select the User data tab.
3. Now, you will the Backup and restore section. To create a backup of your current apps and files on BlueStacks, click on Create backup.
4. You will then get a confirmation box. Proceed with the backup process by clicking on Backup or click on Cancel to abort.
Note: You will not be able to use BlueStacks while the backup is in progress.
5. Upon clicking on Backup, you will be asked to select the location where you want to save the backup copy. For illustration, we chose «Desktop» as shown in the screenshot below.
After choosing the location, click on OK.
6. The backup process will then start. Progress of backup creation can be seen as shown below.
How to restore my backup data
1. Click on the gear icon on the bottom of the sidebar, as shown in the image.
2. It will open the Settings window. Here, select the User data tab.
3. Now, you will the Backup and restore section. To restore a backup copy, click on «Restore backup.«
4. You will now get a confirmation box, asking you to backup your existing data before proceeding with the restoration process. Click on Restore to start restoring your data from a backup copy that was created at an earlier time.
5. Upon clicking Restore, you will be asked for the location of your saved backup. Please select the correct folder and click on OK.
6. The progress of restoring backup can be seen as shown below.

