

How to install ADB and Fastboot
Содержание
-
1 How to install ADB and Fastboot
- 1.1 How to install ADB and Fastboot
- 1.2 What is ADB?
- 1.3 How to Setup ADB and Fastboot tool on Windows and Mac OS
- 1.4 Step 1: Download the Platform-Tools Package
- 1.5 What is the PATH system variable?
- 1.6 Add ADB to System Path for Windows 7, 8
- 1.7 How to Install Adb on Windows
- 1.8 Why You Should Learn ADB and Fastboot
How to install ADB and Fastboot
8 min read 8 min

If you want to root your Android device, install a custom ROM or many other advanced-level techniques then you need to learn how to install ADB and Fastboot on Windows. Here is a guide for getting going on getting the most out of your Android experience as well as a list of the most common mistakes.
What is ADB?
ADB or Android Debug bridge is used to establish a successful connection (bridge) between your device and PC. Once this connection is established, you could carry out plenty of tweaks, both at the system level as well as the application level. For example, you could remove bloatware from your device, pull or push files or install OTA via the Sideload feature. The tech enthusiasts take it a step further and execute some of the more advanced commands.
These include booting their device to stock or custom recovery, booting to fastboot, or Bootloader mode, among other such tasks. But to successfully execute any of the ADB commands, you will have to enable the USB Debugging on your device. This will then unlock the ADB path between your device and PC, and the exchange of commands could then easily be carried out between these devices. On the PC side, you will have to install the Android SDK Platform Tool and then launch a Command Prompt or PowerShell window to execute the ADB commands.
How to Setup ADB and Fastboot tool on Windows and Mac OS
Earlier the installation of ADB and Fastboot drivers was one of the difficult tasks. Sometimes users face regular driver’s issues which becomes a major headache. Thanks to Android developers for their continuous dedications and efforts, today it’s become so ease that you don’t need to download the full Android SDK.
How to Install ADB and Fastboot Drivers on Windows:
There are two methods to set up ADB and Fastboot drivers on your Windows 10,8,8.1,7 and XP. First one is 15 Sec ADB Installer and the second one is Minimal ADB and Fastboot. Both the methods have been explained briefly here. Before we take you to the installation procedure, make sure to enable USB Debugging mode on your Android device.
Install ADB and Fastboot driver on Windows with 15 sec ADB installer:
Step 1: Firstly, download the ADB Installer setup file by XDA member @Snoop05. This not only installs ADB but also installs fastboot and USB Drivers on your Windows PC under 15 seconds.
Step 2: Now you need to run the Exe file adb-setup.exe

Step 3: Now a command windows pops-up and you need to follow the instructions carefully. Finally, type ‘Y’ to start installing ADB and Fastboot drivers.

Step 4: Once done, again you need to type ‘Y’ to install the device drivers. Wait for a while till the installation process is completed.
Step 5: Finally, click on ‘Finish’.

Step 6: That’s it! You have successfully installed ADB and Fastboot on your Windows PC.
Install ADB and Fastboot driver on Windows with Minimal ADB and Fastboot:
Step 1: Download the Minimal ADB and Fastboot Setup by XDA member @shimp208
Step 2: Run the installation process as an administrator.

Step 3: Follow the on-screen instructions to finish the installation process.
Step 4: Finally you have successfully installed Minimal ADB and Fastboot on your Windows PC.

How to Install ADB, Fastboot with Android SDK Tools on macOS:
Step 1: Download Android Command Line Tools to your Mac and extract it.
Step 2: Open the extracted folder and then Tools folder.
Step 3: Next double-click the ‘android’ icon. A Terminal window will open, and seconds later, you will also see the Android SDK Manager window open up. This Android SDK Manager will help to download ADB and Fastboot on your Mac.

Step 4: In the next screen, you will see several items already checked on your Android SDK Manager. Simply, un-check all the items except Android SDK Platform-tools and click on ‘Install 1 package…’.
Step 5: Now another window will open. You need to select ‘Android SDK Platforms-tools’ package present in the left side. Accept the necessary ‘Agree’ option and then hit the Install button.
Step 6: That’s it! ADB and Fastboot drivers will be automatically downloaded and installed on your Mac OS.

Step 7: To confirm the installation, go to the extracted android-sdk-macosx directory and then open the platform-tools folder. Here you will see ADB and fastboot apps, along with several other tools in this directory.
That’s the simple guide to set up ADB and Fastboot drivers on your Windows and Mac PC. For any kind of difficulty during or after the installation process, do let us know in the below comment section.
Method 1: Install the latest versions manually
Part 1: Get ADB and Fastboot driver
- Download the latest ‘platform tools’ (ADB and fastboot drivers) from Google from here.
- Extract the content of the file. You will get a folder called ‘platform tools’.
- Move the ‘platform tools’ folder to C drive so that you can easily access it anytime.


You can use the ADB and Fastboot commands from this folder by making sure your ADB/PowerShell window points to this folder. For this, simply open the command window or a PowerShell window from this folder only. Open the ‘platform tools’ folder, type cmd in its address bar, and then hit the enter key. A command window will open up and its location will be this folder only.
The next part, though, will help you run ADB and Fastboot from anywhere on PC. Which makes it very easy to use ADB and Fastboot commands.
Part 2: Get ADB and Fastboot driver everywhere on PC
This is not a must, BTW, as you can use the ADB and Fastboot from the platform tools folder anytime as explained above. See another guide on the bottom of the article, in a section called “How to use ADB and Fastboot from the ‘platform tools’ folder”.
- Copy the path (address) of the ‘platform tools’ folder. You can shift+right click to get the option called ‘Copy as Path’, using which will copy the path to PC’s clipboard. Mine is in the C drive, and here is its path: “C:platform-tools”

- Open Environment Variables settings by searching for it in Windows search. Otherwise, find it manually as given below:
- Right-click the Computer icon.
- Click Properties.
- Click Advanced system properties.
- In the window that pops up, click Advanced.

- Click Environment Variables.
- Under ‘System variables’ section, click Path option to select it.

- Click the Edit button.
- Add the path of the ‘platform tools’ folder:
- On Windows 10, click the New button, and then copy the path of your ‘platform tools’ folder.

- On the older version of Windows, you may need to copy the path after the current paths added there. Paths are separated by the use of semi-colon, so make sure there is a semi-colon before and after the path of your ‘platform tools’ folder.
- On Windows 10, click the New button, and then copy the path of your ‘platform tools’ folder.
- Click OK, then again OK, and then again OK to exit.
- Open a command window or a PowerShell window and type adb and then hit the enter key, you shall get a list of adb commands. Meaning, adb is working from everywhere on your Windows PC. Try the same with fastboot.
Method 2: 15 Second automatic installer
Note that as the ADB and Fastboot files installed by the automatic installer are quite old now, you need to update them, as given in step 4. So, make sure of that. The drivers installed automatically may cause you problems, for example, when trying to flash a factory image (Android 11 developer preview, for example) where the old ADB and Fastboot drivers will be unable to install the Android 11 ROM properly.
- Download the adb-setup-1.4.3.exe file from here.
- Double-click/run the adb-setup-1.4.3.exe file.
- You will see a command prompt window with blue background. Say YES to all the prompts on this screen.
└ To say YES, just type Y and hit enter.

- Update the installation with the latest drivers:
- Download the latest ‘platform tools’ (ADB and fastboot drivers) from Google from here.
- Extract the content of the file. You will get a folder called ‘platform tools’.
- Copy the content of the ‘platform tools’ folder to the ADB folder in the C drive that was created by the automatic installer.
- Yes, replace all the old files in ‘ADB’ with all the new files from ‘platform tools’ folder. Done!
Once ADB, Fastboot and Drivers are installed, the setup window will automatically close and you’ll have a working ADB and Fastboot setup throughout your system. Enjoy!
Step 1: Download the Platform-Tools Package
Before you can start using ADB and Fastboot commands, you need to grab the SDK Platform Tools from Google. It includes all of the core basics for getting the commands up and running — all without having to install any extra software, which makes it dead simple to set up.
Follow along with the full guide in the link below so you can get everything all taken care of. Once you get ADB and Fastboot set up on your computer, you can move onto the next step of this guide.
What is the PATH system variable?
PATH is used by Windows to specify the location of important executables. Usually, these are files located in the system directories, such as C:Windows and C:Windowssystem32. This is why you can type “calc” in the command prompt to launch calculator, but not “chrome” to launch Google Chrome. This variable is sometimes changed by applications when you install them, such as Java. Java adds itself to the PATH variable on installation, meaning you can use Java from any directory. This is useful to people using Java applications so the program does not have to attempt to hard code the Java location.
We will be modifying the PATH system variable to allow us to use adb or Fastboot anywhere on our Windows computer. PATH also exists on Linux and usually contains the bin and sbin directories. I will cover how to add the platform tools to the Linux PATH variable too.
Note: Both tutorials require administrator/sudo access.В Adding to Windows has two methods. I strongly suggest the first, but both work fine and the second is better if you plan to use the PATH variable a lot.
Add ADB to System Path for Windows 7, 8
- Go to Control Panel >System >Security and click the “Advanced System Settings” button, then click on “Environment Variables”.
 Edit Environment Variables
- Find the variable called “Path” on it to highlight, then click “Edit“.
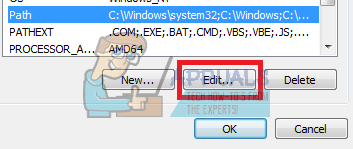 Edit Path of Environment Variables
Add your ADB folder to the end of the variable value, with no spaces, preceded by a semicolon. For example:
How to Install Adb on Windows
To install adb, there is no need to install complete Android Studio or SDK manager. Google has provided direct links to install adb on your computer system. Ok! Now open this download link and select the download file as per the operating system of your computer.
The file will be downloaded in a zip format. Extract the file and the type the target location as c:adb for the extraction of files.
So, now if you navigate to C Drive, you will see a folder named adb, open it and there is a subfolder named platform-tools. In this folder, you will see the adb.exe and other supporting files.
Now, to use the adb command, open command prompt. Press “windows” + “R” keys on the keyboard and you will get run-command window on the screen, now type cmd to open the command prompt.

Next, to run the adb.exe command, you need to first move to its containing folder. So type C.
This will move you to the Root drive i.e C drive.
Now type cd adb
It will take you inside adb folder like c:adb
Now type cd platform-tools in front of c:adb
So your effective command line will show c:adbplatform-tools
Here you are. Now you can use adb commands by typing adb and use other suffixes as per your requirements.

OR alternatively, on your system navigate to the folder where the zip file is extracted. Now pressing shift key on the keyboard and right click on the blank space on the screen and select open command windows here.

Why You Should Learn ADB and Fastboot
Obviously, the commands above are for basic guidance only. They may not all work on all devices. You should only use them if you understand what they will do and how to undo any changes that they make.
ADB and Fastboot are essential parts of the Android rooting and modding game. Learning how to use them is important and will help you make use of more advanced mods.
As we mentioned, to use ADB and Fastboot you need to enable the Developer Options first. Once you’ve done that, a number of other useful settings become available to you.
Android has lots of tweaks available in its Settings and through various apps, but did you know that the Developer options panel hides additional tools you can try? The Developer options are hidden by.

Andy is a former print journalist and magazine editor who has been writing about technology for 15 years. In that time he has contributed to countless publications and produced copywriting work for large tech companies. He has also provided expert comment for the media and hosted panels at industry events.

