

How to Unlock Bootloader on Xiaomi Mi A2/A2 Lite
How to Unlock Bootloader on Xiaomi Mi A2/A2 Lite

An unlocked bootloader is vital if you wish to install custom ROMs, kernels, mods, or a custom recovery like TWRP. Follow this comprehensive guide on how to unlock bootloader on Xiaomi Mi A2/A2 Lite using Fastboot.
The Xiaomi Mi A2 and the A2 Lite are successors to last year’s Mi A1. Following its footsteps, the all-new Mi A2 also comes as a part of the Android One program. Despite being offered the clean stock Android experience, users might often crave for additional features. Like flashing Magisk Modules, installing mods like ViPER4Android and Dolby Atmos for enhanced audio, using root-enabled applications etc. Most of these things rely on a custom recovery such as TWRP and/or root. But before you can even install TWRP or root, you must first unlock bootloader on Xiaomi Mi A2/Mi A2 Lite.
Unlike other Xiaomi phones, unlocking the Mi A2/A2 Lite bootloader does not require the Mi Unlock tool. Which means you do not need to have a registered Mi account and neither do you have to wait for days to finally unlock the bootloader. Rather, the process is much simpler and only requires you to execute the dedicated fastboot unlock command. We have prepared this tutorial to take you through the process in a step-by-step manner.
FAILED (remote: unknown command) Error: Everything you need to know
Although not limited to one domain, but we are seeing reports of most users facing this error while unlocking the bootloader or flashing a file. In the case of former, Motorola devices seem to be the major culprit (though it’s not limited to it). For the latter, booting a TWRP IMG file takes a major share of the blame. But again, these are just two of the ocean causes why this may happen. So fastboot oem unlock and fastboot boot recovery.img are the two most frequent times users face this error.
Furthermore, the strange thing is that your device gets successfully recognized, even when you face the FAILED (remote: unknown command) Error. For example, try executing the adb devices command when your device is connected in the ADB command. Or enter fastboot devices when the device is connected in fastboot mode. In both these cases, you will get the device code as well. So if the PC successfully recognizes your device in ADB and Fastboot Mode, why this error occurs? Well here is everything you need to be aware of and the potential fixes. Follow along.
When Unlocking Bootloader
We have seen many users, especially from the Motorola OEMs being greeted with the following error:
Apart from Motorola, you could also face this error on other OEMs as well. This is because the code in nearly all Android devices is either fastboot oem unlock or fastboot flashing critical. So here is what all you could try out as the fix:
Check ADB and Fastboot Binaries:
When: The Most General Cases
This is the most common error that many users end up committing. There are tons of ADB and Fastboot binaries present around. These include the 2Min ADB tools, the more popular Minimal ADB and Fastboot Tools, and many more. However, we would suggest you to never go for these tools. Only use the official Android SDK and Platform Tools provided by Google. The reason is these tools only contains a few files just necessary to carry out basis ADB and Fastboot commands.
While some times they work, most other times they wouldn’t. Likewise, these tools don’t even get regular updates. So we would request you to leave all the other tools aside and only go with the official one provided. However, if you are already using this build but even then facing the FAILED (remote: unknown command) Error, then refer to the next fix.
Check the OEM Unlock Toggle
When: While Unlocking Bootloader
Case 1
We have seen it happen in some cases that the OEM Unlock toggle might have been disabled. Why does this happen is rather unknown, but this is indeed the case for a few users. So reboot your device either by fastboot reboot command or using the hardware keys and then follow the below steps to enable OEM Unlocking:
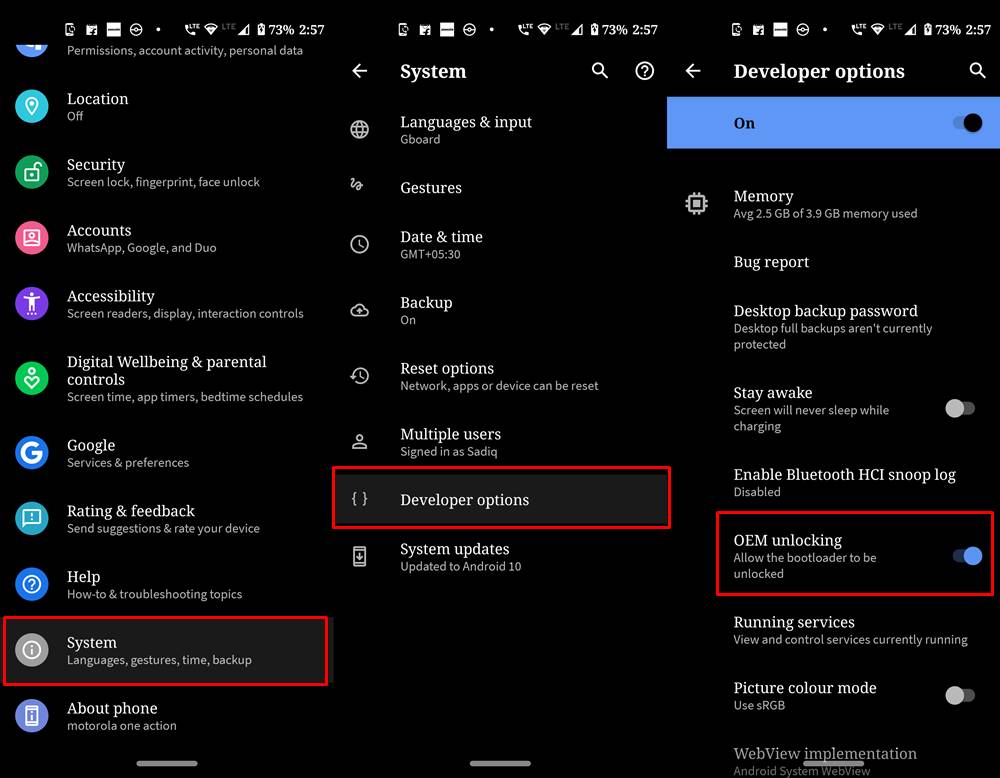
- Head over to Settings on your device
- Go to About Phone > Tap on Build Number 7 times.
- Navigate back to Settings > System > Advanced > Developer Options > Enable the OEM toggle.
- Already enabled, but still getting the FAILED (remote: unknown command) Error? Please refer to the next fix mentioned below.
Case 2
It might also be the case that you are using the wrong command to unlock the bootloader. A very common cause of this error happened with the Nexus 6P users. Unknowingly they were using the fastboot oem unlock command and getting greeted with the said error. The thing was the correct command had been changed now and they had to enter fastboot flashing unlock and in some cases, fastboot flashing unlock critical.
Once you use the new commands, please let us know whether the FAILED (remote: unknown command) Error gets rectified or not.
Case 3
Some devices have stopped the unlocking bootloader process all-together. Nokia and Huawei are two such OEMs that are really against the notion of custom development, it seems. Similarly, you could also see similar messages for other carriers (taken from one of the Motorola Community for one of their devices)
“Your phone is not unlockable as it is not on the unlock list, has a mediatek processor, and doesn’t support the unlock commands”.
“You can’t unlock the bootloader on most Verizon phones . This phone can’t be unlocked.”
Check the Build/Version of the File
When: While Dealing with TWRP and other flashable ZIPs
Since the inception of A/B partition, the recovery partition has been removed. So you no longer can directly flash the twrp file on those devices. As a result, you will first have to boot the img file via fastboot boot twrp.img and then flash the TWRP installer ZIP file to permanently get this custom recovery. However, if you are flashing an incompatible build of TWRP, then this error is bound to occur. If your device officially supports a TWRP Recover, then there is no issue as you could directly get a hold of the same from the TWRP home page. However, the problem stems out from unofficial builds.
Many sites are offering incorrect TWRP builds, which you might have flashed on your device, then the FAILED (remote: unknown command) Error is imminent. Regarding the unofficial build, we would only suggest you search on XDA. The unofficial recoveries that we share here at Droidwin are also taken from XDA as well.
That is the only source of trustworthy unofficial TWRP builds. Also, we would suggest not to flash one variant’s recovery on another. For example, in most cases, you might get success by flashing the Redmi Note 8 TWRP on Note 8 Pro, but in some cases, it might even brick your device. So always keep these points in mind, and you shouldn’t face this issue ever again.
Other General Fixes
When: No specific categorization. Can happen any time and while performing any tweak
If none of the above things worked out, you could also try these tricks. More of than not, it is not the above highly technical tips but the below-mentioned tweaks that do the job. So we would request you to give them a shot as well.
- Also Read: Install Custom ROMs on any Android Device- Includes A/B Partition
Case 1: Remove All Lock Screen Security Measures
First of all, before booting your device to Fastboot or ADB Mode, we would request you to delete all the security locks, including Fingerprint, Face unlock, pattern or Password. Set the lock screen to None, at least for the time being. Here is how it could be done:
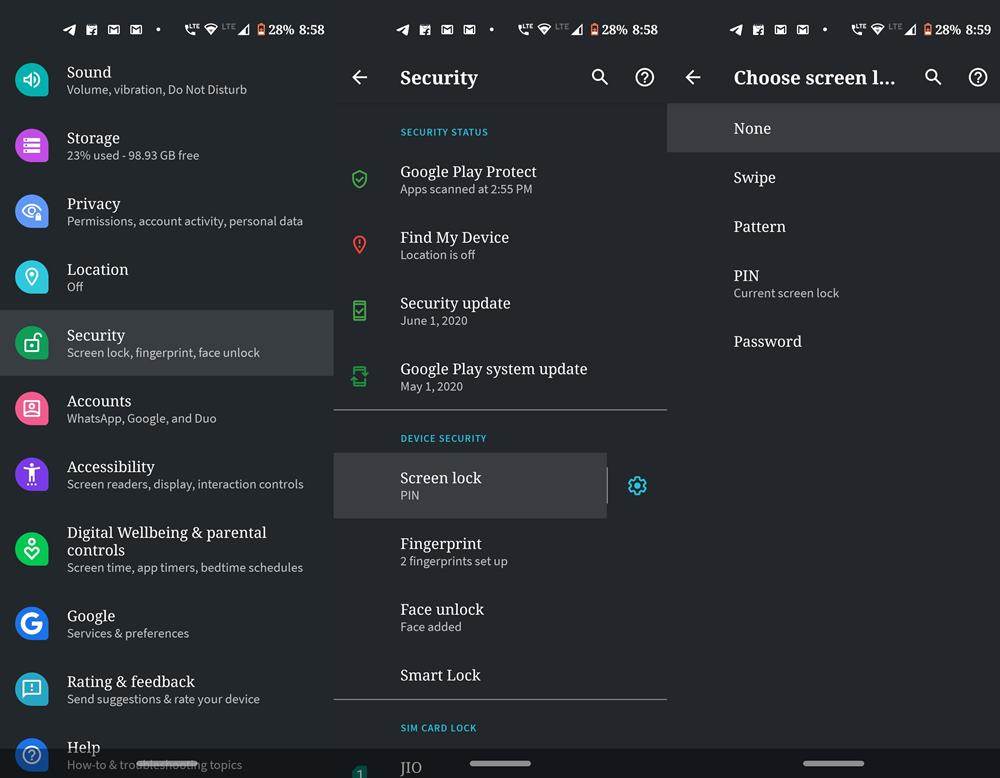
- Head over to Settings and go to Security
- Tap on Screen Lock under the Device Security section.
- Enter your current password and choose None from the menu.
- In the confirmation dialog box that appears, tap on Yes. Remove
- That is it. Now proceed with the ADB and Fastboot commands. Hopefully, you shouldn’t see the FAILED (remote: unknown command) Error. Furthermore, don’t forget to turn on the device protection in the end.
Case 2: USB Drivers
Also, keep in mind that the correct USB drivers are installed. By USB Drivers, we mean both the OEM specific drivers as well as the Fastboot drivers. The former is needed when you connect your device to PC in a switched-on state. This is the case when you wish to execute ADB commands, as in ADB commands, your device remains in a switched-on state. The Fastboot drivers will be needed, as the name suggests when your device is booted to Fastboot Mode.
In that case, you will be needing the drivers from Android SDK and Platform Tools installed on your PC. If you face this error when your device is booted to EDL or Emergency Download Mode, then make sure that the Device Manager shows Qualcomm HS-USB QDLoader 9008, rather than the earlier QUSB_BULK. If that is not the case, then refer to our detailed guide on how to get these drivers. If you have successfully installed the above-mentioned drivers, then proceed with your ADB or Fastboot commands. The FAILED (remote: unknown command) Error might have been rectified by now.
Case 3: USB Port, Cable and Windows Version
Well, all these might sound too easy to be true, yet they sometimes end up doing wonders. All these three have managed to work out in my favor when everything failed. The thing is I was constantly getting bugged with an error or two. Dug up my brain, found out tons of tweaks lying in a corner, and tried them all. Unfortunately, nothing worked out.
Then I just simply switched over to another USB port (it doesn’t matter whether its USB 2.0 or 3.0 port), with another USB cable, and I finally achieved success at one-go. Likewise, you should also consider switching from a Windows 10 laptop or PC to Windows 7. It was also able to fix the FAILED (remote: unknown command) Error one or twice. Just remember to install the SDK and Platform Tools on that Windows 7 PC.
Step 6: Set up your Nokia 8
When your Nokia 8 reboots, it will have been factory reset, so it will be like you just took the phone out of the box. You’ll have to agree to Google’s terms, log into your Google account, etc., just like you did originally.
Nokia 9 (2018) rumored for September (Update: may have notched display)
Once you get everything set up, your device will be ready for flashing custom ROMs, custom recoveries, etc. To get started with that, we recommend you check out our beginner’s guide to flashing LineageOS. Although you might not want LineageOS on your Nokia 8, the guide applies to any custom ROM and will be very helpful if this is your first time.
Did this guide help you unlock your Nokia 8? Let us know in the comments!

