

4 Useful Tools to Monitor CPU and GPU Temperature in Ubuntu
Содержание
-
1 4 Useful Tools to Monitor CPU and GPU Temperature in Ubuntu
- 1.1 4 Useful Tools to Monitor CPU and GPU Temperature in Ubuntu
- 1.2 10 BEST CPU Temperature Monitors Software (2020 Update)
- 1.3 How to Find the CPU Temp With An App: Core Temp
- 1.4 Download MSI Afterburner
- 1.5 CPU usage and CPU utilization monitor: Trend reports in OpManager
- 1.6 How to Monitor Your CPU’s Temperature
4 Useful Tools to Monitor CPU and GPU Temperature in Ubuntu
The CPU or GPU temperature depends entirely on the usage of running programs or applications. Sensitive computer components such as CPUs have a finite lifespan and running them at a temperature that exceeds a certain limit (or at higher temperatures generally) can shorten it. Besides, it can also cause thermal throttling especially when the fan is not providing adequate cooling.
So it is important to monitor your system’s CPU temperature to avoid damaging it as a result of overheating. In this article, we will share some useful command-line tools to help you keep a close eye on the temperature of your CPU and GPU.
1. Glances
Glances is a cross-platform, advanced and popular real-time system monitoring tool that uses the psutil library to gather information from various system resources.
It can display information from sensors using the psutil and/or hddtemp tools. One of its intriguing features is the webserver mode which allows you to access it via a web browser to remotely monitor your Linux server.
There are various methods to install Glances on your system, but the preferred way of installing glances is using an auto-install script, which will install the latest production-ready version.
To install Glances on your system, use curl or wget command as shown.
Once you have installed it, start Glances and press f key to view sensors information.
![]()
![]() Glances – Monitor CPU and GPU Temperature
Glances – Monitor CPU and GPU Temperature
2. Sensors
Sensors is a simple command-line utility that displays the current readings of all sensor chips including the CPU. It comes pre-installed some Linux distributions such as Ubuntu by default, otherwise install it as shown.
Then you can run the following command to detect all sensors on your system.
![]()
![]() Detect Sensors in Linux
Detect Sensors in Linux
Once detected, you can run the following command to check CPU temperature, GPU temperature, fan speed, voltage, etc.
![]()
![]() Sensors – Show CPU and GPU Temperature
Sensors – Show CPU and GPU Temperature
3. Hardinfo
Hardinfo is a lightweight system profiler and benchmark tool designed for hardware analysis and report generation. It features comprehensive reports on system hardware and allows for the generation of HTML reports on your system’s hardware.
To install the hardinfo package on your Ubuntu Linux system, run the following command.
After the installation is complete, you can launch hardinfo to view devices’ information by running the following command.
![]()
![]() View Device Information in Linux
View Device Information in Linux
To launch the GUI app, simply run the following command or search for ‘System Profiler and Benchmark’ in the system menu or Dash and open it.
Then click on sensors to view sensors information as shown in the following screenshot.
![]()
![]() View Sensors Information in Ubuntu
View Sensors Information in Ubuntu
4. i7z
i7z is a tiny command-line utility that reports Intel Core i7, i5, i3 CPU information including temperatures. You can install it on your Ubuntu system by running the following command.
Once installed, run i7z with root privileges as shown.
![]()
![]() Show Intel Core Information with Temperature
Show Intel Core Information with Temperature
You might also like to read these useful related articles.
That’s all for now! In this article, we have shared the useful command-line tools for viewing CPU and GPU temperatures in a Ubuntu system. Have your say about this article or ask questions via the feedback form below.
10 BEST CPU Temperature Monitors Software (2020 Update)
Monitoring the temperature of the processor is essential because it can affect the performance of your PC. The processor houses many computer parts like motherboard, hard disk, etc. Heat can damage these components.
CPU temperature monitors tools help you to overcome this situation. These applications check computer system sensors like temperature, fan speed, voltage, and give you precise information. You can effortlessly detect problems with this data.
Following is a handpicked list of Top CPU Temperature Monitors tools, with their popular features and website links. The list contains both open source(free) and commercial(paid) software.
1) HWMonitor
HWMonitor is a program that reads PC systems sensors like temperature, fan speed, voltages, etc. It can be used on the Windows and Android operating systems. This tool can monitor PC or mobile using a TCP/IP connection.

Features:
- You can manually edit sensor labels.
- It has a firewall that can detect non declared port access.
- Generate the logging graph as a bitmap file.
- It has improved interface with editable sensor labels.
- You can check CPU utilization and bandwidth.
2) AIDA64 Extreme
AIDA64 Extreme is a PC temp monitoring tool that runs on Windows, iOS, and Android platforms. The latest version of this program displays detailed information on computer components. The information given by this software can be saved in CSV (Comma Separated Values), HTML, or XML formats.

Features:
- This tool offers more than 50 pages of information on installed programs, software licenses, etc.
- It provides details of computer internals without the need to open it.
- Supports multi-threaded memory and cache to analyze system RAM bandwidth.
- It has a panel that can be used with different graphs, custom images linked with sensor data.
- AIDA64 Extreme can display data on devices like LCD or VFD (Variable Frequency Drive).
3) Core Temp
Core Temp is a simple tool to check the CPU temp of an x86 based processor. It supports all manufactures like AMD (Advanced Micro Devices, and Intel,etc.).

Features:
- Core Temp is easy to use.
- This tool accurately read directly from DTS (Digital Thermal Sensor).
- It enables a high level of customization.
- It provides a platform for plugins that allow developers to add new features.
4) Speccy
Speccy is a CPU temperature monitoring software that runs on windows operating system. This tool shows user information related to the hardware and software of the PC. You can use this software to know the type and amount of RAM in your computer system.

Features:
- Provides a quick summary of hardware installed in your system.
- It offers detailed information about the hardware.
- You can see the real-time temperature of the CPU.
- It allows you to save your result as a snapshot, text file, or XML for easy sharing.
- This software updates automatically.
- It enables you to find the problem that occurs in your system.
5) AIDA64 Engineer
AIDA64 Engineer is a tool that offers detailed information about installed software and provides diagnostic functions. It supports overclocking ( the process of increasing clock rate).

Features:
- Supports multi-threaded memory and cache to analyze system RAM bandwidth.
- This tool offers more than 50 pages of information on installed programs, software licenses, etc.
- AIDA64 Engineer can display data on devices like LCD or VFD (Variable Frequency Drive).
- It has a panel that can be used with different graphs, custom images linked with sensor data.
- It provides details of computer internals without the need to open it.
6) SIW
SIW is a downloadable Windows-based software that offers functional and advanced system information for PC. It can gather details about the system and display it in easy to understand format.

Features:
- This tool allows you to create a report file in HTML, TXT, XML, or CSV format.
- Supported client platforms are Windows 10, Windows 8.1, Windows 7, etc.
- You can use it for computer hardware and software, network information, software licensee management, security audit, etc.
- It does not require any installation.
- You can run this software from a network drive, flash drive, domain login script, etc.
- This tool supports server platforms like Windows 2019, Windows 2016, Windows 2012, etc.
- Software updates periodically so that you can get an accurate result.
7) Real Temp
Real Temp is a temperature monitoring software specially designed for all Intel processors. This tool can individually adjust the temperature for each core of the CPU.
Features:
- The program depends on temperature data, which is gathered using a Fluke 62 IR Thermometer.
- Test sensors that check your DTS (Data Transformation Services) sensors for any sign of problems.
- You can keep track of the minimum and maximum temperatures.
- Quick, very accurate, and repeatable programs that are running.
- You do not require to install this software or to modify the registry.
8) HWiNFO
HWiNFO is a free software for windows. It gives you a quick overview as well as detailed information on hardware components. You can use this software and save custom or full reports on a portable device.

Features:
- It is easy to read and navigate.
- You can export a report on select devices.
- This tool allows you to copy specific results out of this software.
- It also includes the DOS version as well as a portable version.
- HWiNFO releases program updates regularly.
9) SpeedFan
SpeedFan is a hardware monitoring tool that can monitors fan speeds, voltages, and temperatures in PC. This tool can change PC fan speed depends on the temperature of hardware components.

Features:
- This tool supports the SCSI (Small Computer System Interface).
- It can change FSB (Frontside Bus) on some hardware.
- SpeedFan can help you to reduce noise.
- The software works with Windows.
- It can access temperature sensors and can even change the fan speed.
10) Open Hardware Monitor
The Open Hardware Monitor is a free tool that monitors CPU temperature, fan, and clock speeds voltages of a PC. This tool can checks CPU temperature by reading sensors of AMD and Intel.

Features:
- It can display the temperature of a hard drive.
- You do not need any installation to use this software.
- This tool runs on 32 bits, and 64-bit Windows operating systems.
- You can quickly view monitored values from the main window, in a customizable desktop, or in the system tray (the area which is located in the Windows taskbar).
⚡ Why monitoring the temperature of the processor is essential?
Monitoring the temperature of the processor is essential because it can affect the performance of your PC. The processor houses many computer parts like motherboard, hard disk, etc. Heat can damage these components.
What are CPU temperature monitoring tools?
CPU temperature monitoring tools check sensors like temperature, fan speed, voltage, and give you precise information. These applications help you to detect problems with this data effortlessly.
✔️ Mention the general features of CPU temperature monitoring tools?
The general features of CPU temperature monitoring tools are:
- It enables a high level of customization.
- You can check CPU utilization and bandwidth.
- It offers detailed information about the hardware.
- You can see the real-time temperature of the CPU.
How to Find the CPU Temp With An App: Core Temp
If you are looking for a fast way to check your CPU temp, it can be done quickly by downloading apps. There are apps to check CPU temp on both Windows and Mac devices. One of the most accessible ways to monitor the temperature of all your computer’s processors is with the Core Temp app.
Follow these steps to check CPU temperature with Core Temp:
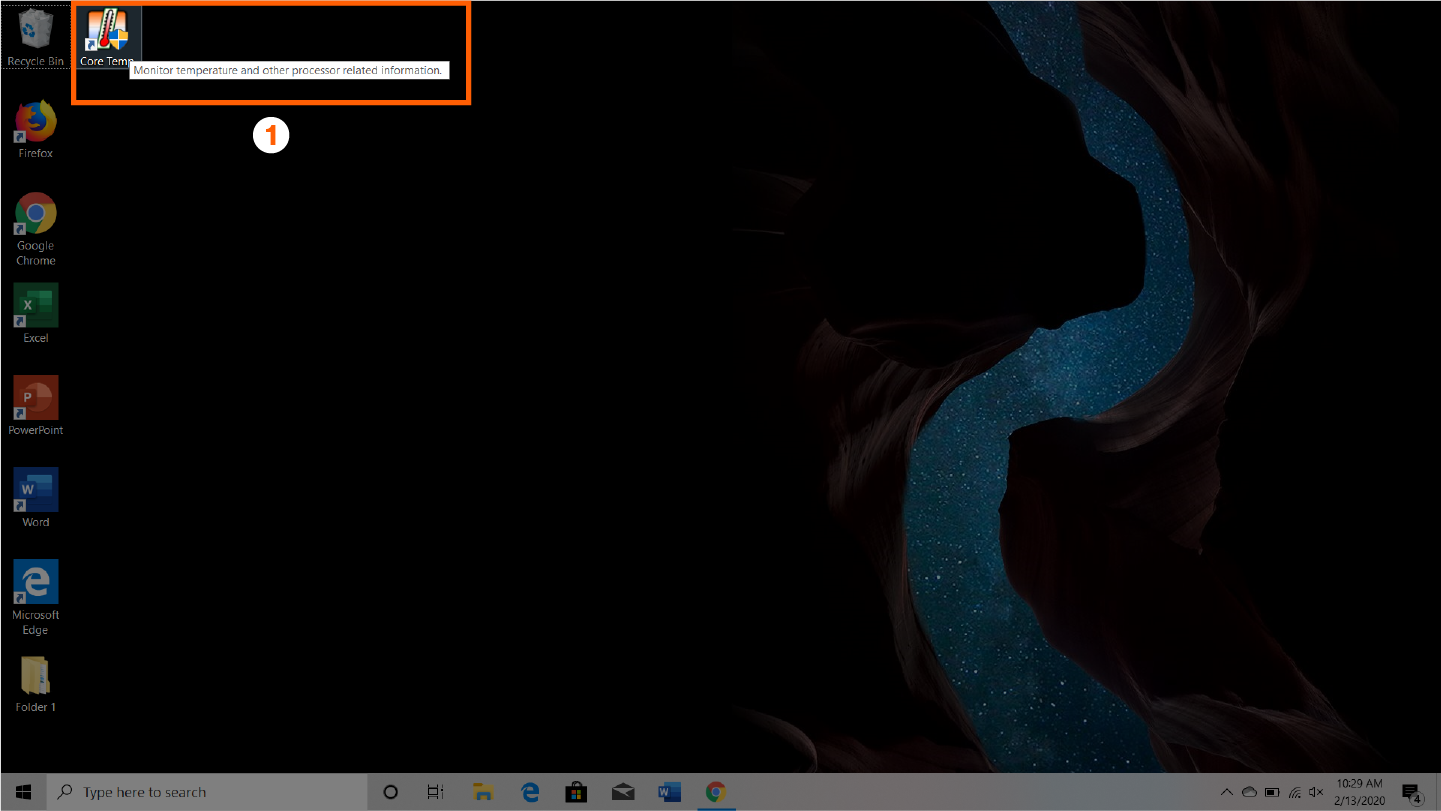
Step 1: Open the application from your desktop.
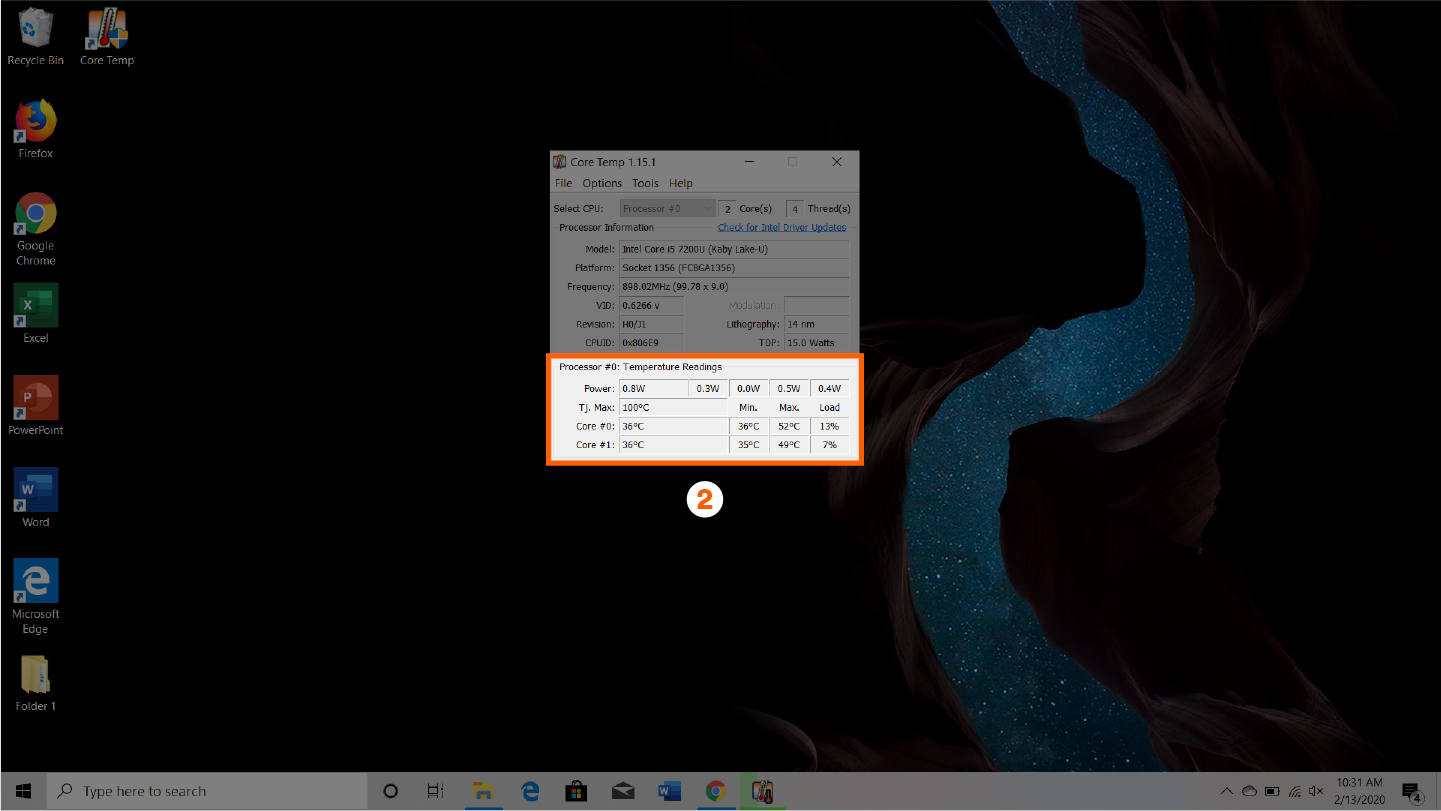
Step 2: Locate the temperatures of your processors at the bottom of the widget.
Step 3: Maneuver to the bottom of your taskbar and select “show hidden icons” to quickly access core temps.

If you are looking to check CPU temp for macOS then you can download the Fanny Widget that allows you to monitor your fans and CPU temp right from your menu bar. For more control, you can even download SpeedFan, which allows you to manually control the speeds of your fans. For gamers and those wishing to access more information, you can download HWMonitor for a more detailed layout.
Download MSI Afterburner
MSI Afterburner isn’t the only software in the market that allows you to keep an eye on your internals, but it’s one of the easier ones to use, and it offers a great range selections.
Head over the bottom of MSI Afterburner’s official page or simply download it here. MSI Afterburner comes bundled with the RivaTuner Statistics Server (RTSS), which is actually what you need to have an in-game overlay with various statistics regarding your system.
While setting up MSI Afterburner, make sure to tick the box that reads “RivaTuner Statistics Server” when you’re prompted with which programs you’d like to install. The installer will set up both programs after you click next, and RTSS will always launch alongside MSI Afterburner every time you run the program. It won’t appear on your screen, however, and you’ll need to open it through its icon, which will be located on the bottom right corner of your screen.
Launch MSI Afterburner and start configuring your settings
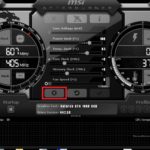
When you first open MSI, you’ll be greeted with a small screen that looks like a car dashboard. You can find the clock speeds of your GPU on this panel in addition to its temperature. Click on the settings icon, a grey-black cog symbol placed toward the middle part of the window.
Once inside, head over to the monitoring tab, next to the “Fan” option on the top panel. There’ll be a ton of options in the monitoring tab. Make sure you’re going through the options listed below “Active hardware monitoring graphs” since CPU usage will be listed below this category alongside other useful statistics.
Put a checkmark on CPU Usage and all the other stats you want to track. While you’re doing that, click on each of them to turn on “Show in On-Screen Display” for each individual stat. This will make sure you’ll be able to see them live while you’re playing games and as they get recorded in the back.
If you’d like to turn on or off the on-screen display by command, not to occupy precious screen real estate, head over to the “On-Screen Display” tab, which is located next to the Monitoring section, and set yourself a hotkey to toggle on and off the on-screen display.
Go over the Rivatuner Statistics Server settings
Now that you’ve set everything you need on MSI Afterburner’s panel, you’ll need to make some finer adjustments on RTSS’ interface, which’s the program responsible for the in-game overlay you’ll be seeing.
Click on the RTSS icon located at the right bottom left of your screen. If you can’t see it there, click on the arrow pointing up to reveal more programs running in the background.
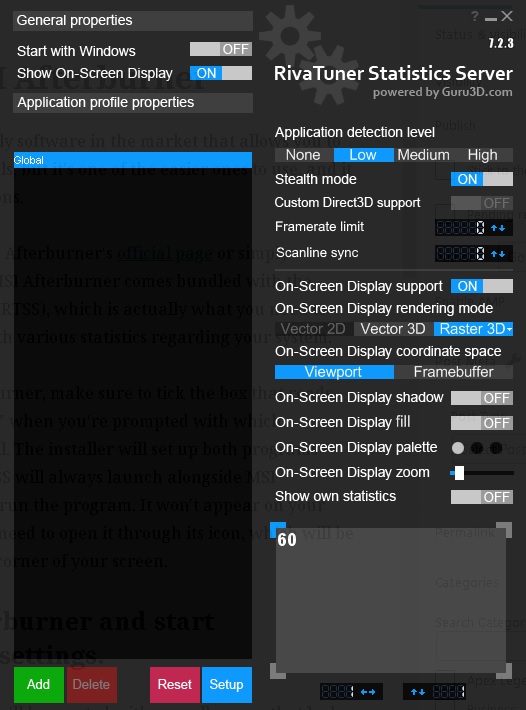
Once you open RTSS, make sure you have “Show On-Screen Display” and “On-Screen Display Support” turned on. You can easily make further customizations through here like your overlay’s size and where on the screen you would like to see it. We also recommend turning on the Stealth mode since there are a handful of games that don’t allow on-screen overlays even if their goal is to track your PC’s statistics. The Stealth mode makes sure RTSS stays under the radar.
Launch the game of your choice
If you’ve successfully followed all the steps so far there should be an in-game overlay on your screen when you launch the game of your choice. You can customize your overlay while your game is on, so we recommend going into the practice mode to make sure your overlay doesn’t block a part of your screen that could be essential during a match.
CPU usage and CPU utilization monitor: Trend reports in OpManager
OpManager provides over 100 built-in reports. Using the reports feature and based on any parameter for measuring CPU usage, a report can be manually generated or scheduled to be auto-generated as a designated time.
OpManager’s reports can be organized to show interfaces or devices with the highest CPU utilization, CPU efficiency, and interface errors for a particular time frame. It is possible to drill down into these metrics to learn more from the reports. Reports can be saved as PDF, HTML or sent via email.

Monitoring CPU usage is one among the many functionalities OpManger has up its sleeves when it comes to CPU monitoring. OpManager’s comprehensive CPU monitoring funtionalities encompass tracking CPU performance, monitoring CPU hardware metrics, holistic dashboards dedicated to CPU monitoring and much more.
To know more on how OpManager can help you in your CPU monitoring efforts, dowload a 30-day free trial or register for a demo.
How to Monitor Your CPU’s Temperature
Checking your CPU temperature is as easy as firing up a monitoring program and using it to read out the value. Examples of these programs are HWMonitor, Core Temp, or NZXT’s CAM. These three are just a few examples of many, and for the purpose of this how-to we’ll show you how NZXT’s CAM and Core Temp work because we have found that these two are the easiest to use for casual purposes.
CAM is developed by PC case, power supply and CPU cooler manufacturer NZXT. While it’s intended to be used with their product, it works really well as a casual monitoring tool even if you don’t own any NZXT hardware.
Once installed, CAM offers a well-presented user interface (UI). The first block features the CPU’s status, which shows the load, temperature, clock speed and cooler fan speed. You can click on this block to access further details, as shown in the image below.

(Image credit: NZXT)
As you can see, the current temperature of this system’s CPU is 41 degrees Celsius, which is a healthy idle temperature.
CAM also has an overlay, which automatically turns on when you enter a game when CAM is running. This overlay can show you your CPU’s status while in-game, providing you with load temperature measurements.
You can also use the Core Temp tool to monitor the temperatures, which is a simpler tool that works with a more basic UI. Just be sure to untick the freeware in the installation menu first.
(Image credit: Core Temp)
As you can see, this CPU has been running at a temperature of 46 degrees Celsius and a maximum of 75 degrees Celsius (167 degrees Fahrenheit) and is, therefore, running at a normal temperature. The stress test temperature was achieved by running Prime95 for about 30 minutes, though the CPU hit its maximum temperature of 75 degrees Celsius within 10 minutes.
With Core Temp, the best way to monitor your temperature while gaming is to just have a good session, and then check back in with the program to see what the maximum recorded temperature is. Again, if this figure is at or beyond 95 degrees, you should be concerned. Anything between 80 and 95 degrees may have room for improvement.
The following table lists the test results when the monitor is in an Up state.
| Test Result | Description |
|---|---|
| Usage | The CPU load currently on the system represented as a percentage (%). |
| Usage-avg | The average CPU load on the system represented as a percentage (%). This result is based on the tests performed during the length of time specified in the Sample Size field. |
Developed by network and systems engineers who know what it takes to manage today’s dynamic IT environments, SolarWinds has a deep connection to the IT community.
The result? IT management products that are effective, accessible, and easy to use.

